This article is the fifth in a series of posts looking at Microsoft’s new Rights Management product set. In an earlier previous post we looked at turning on the feature in Office 365 and in this post we will look at enabling on-premises Exchange Servers to use this cloud based RMS server. This means your cloud users and your on-premises users can shared encrypted content and as it is cloud based, you can send encrypted content to anyone even if you are not using an Office 365 mailbox.
In this series of articles we will look at the following:
- What is Rights Management
- Turning on Azure Active Directory Rights Management
- Managing Azure Active Directory Rights Management
- Enabling and Configuring AADRM in Exchange Online
- Enabling AADRM in SharePoint Online
- Creating Microsoft Rights Management Templates and Policies
- Configuring Exchange On-Premises to Use AADRM (this article)
- Configuring SharePoint On-Premises to Use AADRM
- Using AADRM from Microsoft Office
- Using AADRM to protect anything else
The items above will get lit up as the articles are released – so check back or leave a comment to the first post in the series and I will let you know when new content is added.
Exchange Server integrates very nicely with on-premises RMS servers. To integrate Exchange on-premises with Windows Azure Rights Management you need to install a small service online that can connect Exchange on-premises to the cloud RMS service. On-premises file servers (classification) and SharePoint can also use this service to integrate themselves with cloud RMS.
You install this small service on-premises on servers that run Windows Server 2012 R2, Windows Server 2012, or Windows Server 2008 R2. After you install and configure the connector, it acts as a communications interface between the on-premises IRM-enabled servers and the cloud service. The service can be downloaded from http://www.microsoft.com/en-us/download/details.aspx?id=40839
From this download link there are three files to get onto the server you are going to use for the connector.
- RMSConnectorSetup.exe (the connector server software)
- GenConnectorConfig.ps1 (this automates the configuration of registry settings on your Exchange and SharePoint servers)
- RMSConnectorAdminToolSetup_x86.exe (needed if you want to configure the connector from a 32bit client)
Once you have all this software (or that which you need) and you install it then IT and users can easily protect documents and pictures both inside your organization and outside, without having to install additional infrastructure or establish trust relationships with other organizations.
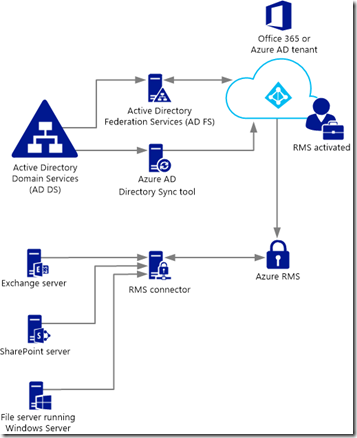
The overview of the structure of the link between on-premises and Windows Azure Rights Management is as follows:
Notice therefore that there are some prerequisites needed. You need to have an Office 365 tenant and turn on Windows Azure Rights Management. Once you have this done you need the following:
- Get your Office 365 tenant up and running
- Configure Directory Synchronization between on-premises Active Directory and Windows Azure Active Directory (the Office 365 DirSync tool)
- It is also recommended (but not required) to enable ADFS for Office 365 to avoid having to login to Windows Azure Rights Management when creating or opening protected content.
- Install the connector
- Prepare credentials for configuring the software.
- Authorising the server for connecting to the service
- Configuring load balancing to make this a highly available service
- Configuring Exchange Server on-premises to use the connector
Installing the Connector Service
- You need to set up an RMS administrator. This administrator is either the a specific user object in Office 365 or all the members of a security group in Office 365.
- To do this start PowerShell and connect to the cloud RMS service by typing Import-Module aadrm and then Connect-AadrmService.
- Enter your Office 365 global administrator username and password
- Run Add-AadrmRoleBasedAdministrator -EmailAddress <email address> -Role “GlobalAdministrator” or Add-AadrmRoleBasedAdministrator -SecurityGroupDisplayName <group Name> -Role “ConnectorAdministrator”. If the administrator object does not have an email address then you can lookup the ObjectID in Get-MSOLUser and use that instead of the email address.
- Create a namespace for the connector on any DNS namespace that you own. This namespace needs to be reachable from your on-premises servers, so it could be your .local etc. AD domain namespace. For example rmsconnector.contoso.local and an IP address of the connector server or load balancer VIP that you will use for the connector.
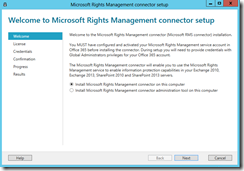
- Run RMSConnectorSetup.exe on the server you wish to have as the service endpoint on premises. If you are going to make a highly available solutions, then this software needs installing on multiple machines and can be installed in parallel. Install a single RMS connector (potentially consisting of multiple servers for high availability) per Windows Azure RMS tenant. Unlike Active Directory RMS, you do not have to install an RMS connector in each forest. Select to install the software on this computer:

- Read and accept the licence agreement!
- Enter your RMS administrator credentials as configured in the first step.
- Click Next to prepare the cloud for the installation of the connector.
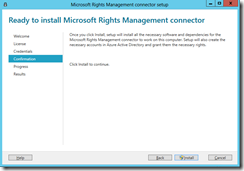
- Once the cloud is ready, click Install. During the RMS installation process, all prerequisite software is validated and installed, Internet Information Services (IIS) is installed if not already present, and the connector software is installed and configured

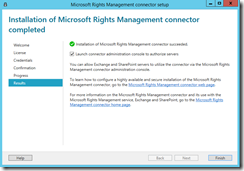
- If this is the last server that you are installing the connector service on (or the first if you are not building a highly available solution) then select Launch connector administrator console to authorize servers. If you are planning on installing more servers, do them now rather than authorising servers:

- To validate the connector quickly, connect to http://<connectoraddress>/_wmcs/certification/servercertification.asmx, replacing <connectoraddress> with the server address or name that has the RMS connector installed. A successful connection displays a ServerCertificationWebService page.
- For and Exchange Server organization or SharePoint farm it is recommended to create a security group (one for each) that contains the security objects that Exchange or SharePoint is. This way the servers all get the rights needed for RMS with the minimal of administration interaction. Adding servers individually rather than to the group results in the same outcome, it just requires you to do more work. It is important that you authorize the correct object. For a server to use the connector, the account that runs the on-premises service (for example, Exchange or SharePoint) must be selected for authorization. For example, if the service is running as a configured service account, add the name of that service account to the list. If the service is running as Local System, add the name of the computer object (for example, SERVERNAME$).
- For servers that run Exchange: You must specify a security group and you can use the default group (DOMAIN\Exchange Servers) that Exchange automatically creates and maintains of all Exchange servers in the forest.
- For SharePoint you can use the SERVERNAME$ object, but the recommendation configuration is to run SharePoint by using a manually configured service account. For the steps for this see http://technet.microsoft.com/en-us/library/dn375964.aspx.
- For file servers that use File Classification Infrastructure, the associated services run as the Local System account, so you must authorize the computer account for the file servers (for example, SERVERNAME$) or a group that contains those computer accounts.
- Add all the required groups (or servers) to the authorization dialog and then click close. For Exchange Servers, they will get SuperUser rights to RMS (to decrypt content):


- If you are using a load balancer, then add all the IP addresses of the connector servers to the load balancer under a new virtual IP and publish it for TCP port 80 (and 443 if you want to configure it to use certificates) and equally distribute the data across all the servers. No affinity is required. Add a health check for the success of a HTTP or HTTPS connection to http://<connectoraddress>/_wmcs/certification/servercertification.asmx so that the load balancer fails over correctly in the event of connector server failure.
- To use SSL (HTTPS) to connect to the connector server, on each server that runs the RMS connector, install a server authentication certificate that contains the name that you will use for the connector. For example, if your RMS connector name that you defined in DNS is rmsconnector.contoso.com, deploy a server authentication certificate that contains rmsconnector.contoso.com in the certificate subject as the common name. Or, specify rmsconnector.contoso.com in the certificate alternative name as the DNS value. The certificate does not have to include the name of the server. Then in IIS, bind this certificate to the Default Web Site.
- Note that any certificate chains or CRL’s for the certificates in use must be reachable.
- If you use proxy servers to reach the internet then see http://technet.microsoft.com/en-us/library/dn375964.aspx for steps on configuring the connector servers to reach the Windows Azure Rights Management cloud via a proxy server.
- Finally you need to configure the Exchange or SharePoint servers on premises to use Windows Azure Active Directory via the newly installed connector.
-
- To do this you can either download and run GenConnectorConfig.ps1 on the server you want to configure or use the same tool to generate Group Policy script or a registry key script that can be used to deploy across multiple servers.
- Just run the tool and at the prompt enter the URL that you have configured in DNS for the connector followed by the parameter to make the local registry settings or the registry files or the GPO import file. Enter either http:// or https:// in front of the URL depending upon whether or not SSL is in use of the connectors IIS website.
- For example .\GenConnectorConfig.ps1 –ConnectorUri http://rmsconnector.contoso.com -SetExchange2013 will configure a local Exchange 2013 server
- If you have lots of servers to configure then run the script with –CreateRegEditFiles or –CreateGPOScript along with –ConnectorUri. This will make five reg files (for Exchange 2010 or 2013, SharePoint 2010 or 2013 and the File Classification service). For the GPO option it will make one GPO import script.
- Note that the connector can only be used by Exchange Server 2010 SP3 RU2 or later or Exchange 2013 CU3 or later. The OS on the server also needs to be include a version of the RMS client that supports RMS Cryptographic Mode 2. This is Windows Server 2008 + KB2627272 or Windows Server 2008 R2 + KB2627273 or Windows Server 2012 or Windows Server 2012 R2.
- For Exchange Server you need to manually enable IRM as you would do if you had an on-premises RMS server. This is covered in http://technet.microsoft.com/en-us/library/dd351212.aspx but in brief you run Set-IRMConfiguration -InternalLicensingEnabled $true. The rest, such as transport rules and OWA and search configuration is covered in the mentioned TechNet article.
- Finally you can test if RMS is working with Test-IRMConfiguration –Sender billy@contoso.com. You should get a message at the end of the test saying Pass.
- If you have downloaded GenConnectorConfig.ps1 before May 1st 2014 then download it again, as the version before this date writes the registry keys incorrectly and you get errors such as “FAIL: Failed to verify RMS version. IRM features require AD RMS on Windows Server 2008 SP2 with the hotfixes specified in Knowledge Base article 973247” and “Microsoft.Exchange.Security.RightsManagement.RightsManagementException: Failed to get Server Info from http://rmsconnector.contoso.com/_wmcs/certification/server.asmx. —> System.Net.WebException: The request failed with HTTP status 401: Unauthorized.”. If you get these then turn of IRM, delete the “C:\ProgramData\Microsoft\DRM\Server” folder to remove old licences, delete the registry keys and run the latest version of GetConnectorConfig.ps1, refresh the RMS keys with Set-IRMConfiguration –RefreshServerCertificates and reset IIS with IISRESET.
Now you can encrypt messages on-premises using your AADRM licence and so not require RMS Server deployed locally.

Leave a Reply