Message Classifications are a way to tag email with a property that describes the purpose of the email, for example “Internal Use Only” might be a classification to tell the recipient of the email that the message should not be forwarded. Classifications are configured by administrators and appear shortly after creation in Outlook Web App, but need further work for them to appear in Outlook. Once you have a classification system in place, you can use Transport Rules in Exchange to read the classification and act on the message, for example if the message is classified “Internal Use Only” and the recipient is in an external domain then an NDR could be returned and the message dropped.
This blog post will cover the following:
- Creating a message classification
- Localising message classifications for different geographies and language groups
- Classification considerations when you have multiple Exchange organizations
- Creating a transport rule to act on a classified message
- Sending messages with classification via OWA
- Setting up Outlook to use message classifications
- Sending messages with classification via Outlook
Creating a Message Classification
This needs to be done in the Exchange Management Shell. It is a single cmdlet per classification. A simple example being:
New-MessageClassification -Name “CorporateConfidential” -DisplayName “Corporate Confidential” -SenderDescription “This email is confidential for the entire company and not to be distributed outside the company”
This creates a classification called Default\Name. In the above example this would be Default\CorporateConfidential. This value is not seen by anyone other than the administrators of Exchange, users see the DisplayName value. The SenderDescription appears at the top of the message as it is being written in Outlook or OWA and you can have a different RecipientDescription for display in the recipients email. In the above example the SenderDescription (which is required) will also be the RecipientDescription as that was not specifically set.
Note that you can only have 15 message classifications per Exchange Online tenant (M365/Entra ID tenant). If you try to create more than 15 you will get the error “New-MessageClassification: |System.InvalidOperationException|A new message classification can’t be created. You have reached the limit of 15 message classifications. Remove one or more existing message classifications or locales by using the
Remove-MessageClassification command.“
Localising Message Classifications
If you want to localise the classification continue with something similar to this (translations from Bing!) by changing the display and description text and setting the locale to match:
New-MessageClassification -Name “CorporateConfidential” -DisplayName “Société Confidentielle” -SenderDescription “Cet email est confidentiel pour l’ensemble de l’entreprise et de ne pas être distribués à l’extérieur de l’entreprise” -Locale FR-FR
Once you have the correct translation, which you need for the DisplayName and SenderDescription, you run the cmdlet which sets the language against the previously created classification. Note that at the time of writing this cmdlet does not work in Exchange Online (see reported issue for more).
Classifications and Hybrid Mode (or multiple Exchange organizations)
If you have both installed an Office 365 tenant and on-premises organization (i.e Hybrid Mode) then you should create the classifications in one organisation (recommend the on-premises org) and export them for use in Outlook (see later in the blog). For the other organization (recommend Exchange Online) you should use the same cmdlets to create the classifications again in Exchange Online but specify the ClassificationID that was automatically set when the classification was made on-premises – the same classification in both organizations should have matching ClassificationID. To get the ClassificationID from Exchange on-premises before running the cmdlets again in remote PowerShell use Get-MessageClassification | FT Name,ClassificationID
Creating a Transport Rule That Uses Message Classifications
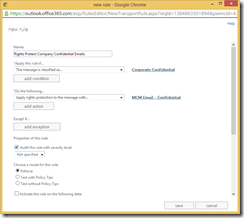
1Create a new transport rule that implements RMS protection with the “CompanyName – Confidential” template if the message is flagged with the previously created classification. The following screenshot shows the required properties, or you could use PowerShell:
New-TransportRule -Name “Rights Protect Company Confidential Emails PS” -HasClassification CorporateConfidential -ApplyRightsProtectionTemplate “CompanyName – Confidential”
Remember to change the name of the classification and the RMS template name to suit. Also remember that if you have Hybrid Exchange mode enabled, you need to create the transport rule in both locations, therefore you need RMS enabled in both locations (though if you are not using RMS as this example does, you do not need it enabled to do message classificaitions).
Classifications and OWA
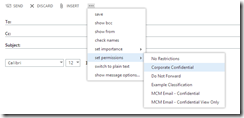
Once the rule and the classification are created, send an email using OWA where you have set the classification during composing the email. Note that during testing I found it could take up to 24 hours for Exchange Online to show both the RMS templates in OWA and the message classifications.

Note that at the time of writing there is a bug in OWA in Exchange 2013 that causes transport rules to not see the classification correctly. Tests using Outlook (see the next few steps) will work fine.
Classifications and Outlook
It is more complex to do message classifications for Outlook as you need to export the classifications from Exchange Server as an XML file, place the XML file in a location the Outlook client computer can get to and set some registry keys. The steps are as follows:
- To send the email using Outlook you need to first export the message classification using Export-OutlookClassification.ps1 script from Exchange on-premises (in the Exchange/v15/scripts folder of your installation). To export from Exchange Online you need to copy this script from an on-premises installation and run it in your remote PowerShell window connected to Exchange Online.
- Once you have the Classifications XML you need to copy this to each Outlook computer and run Regedit on these computers to enable classifications and to point to the classification file. The regedit settings are:
- [HKEY_CURRENT_USER\Software\Microsoft\Office\16.0\Common\Policy]
- “AdminClassificationPath”=”c:\\temp\\temp\\classifications.xml”
- “EnableClassifications”=dword:00000001
- “TrustClassifications”=dword:00000001
- You need to set the path correctly in the registry as to the location (on the local computer or always available network drive) that the classifications xml file is located, note the use of \\ in the AdminClassificationPath as you cannot use \ as that is a special character in this file. This registry set is for Outlook 2016 – change the version number from 16.0 to suit earlier versions of Outlook (2013 = 15.0, 2010 = 14.0).
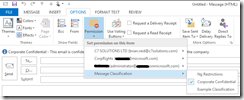
- Once the registry is set and the classifications XML file in the location the registry will look in, restart Outlook and compose a test message, setting the classification you are looking for in transport rules.

- When the message arrives at the destination inbox, if it was sent with the classification then it should have the RMS template applied (the action of the transport rule). In the following screenshot you can see two emails in Outlook. The lower email was sent with OWA and due to an OWA bug the classification is set incorrectly and so it is not RMS protected as the transport rule does not fire. The upper email can be seen to have RMS protection, though I cannot screenshot it as it has RMS protection and that stops me using PrintScreen or OneNote screen clipping tools whilst that message is open!


Leave a Reply