This article is based on the public preview of the use of hardware tokens/Microsoft Authenticator to do sign-in without passwords released in July 2019
Using Microsoft Authenticator for Passwordless Sign-in
You used to be able to do this by running the following in PowerShell for the last few years
New-AzureADPolicy -Type AuthenticatorAppSignInPolicy -Definition ‘{“AuthenticatorAppSignInPolicy”:{“Enabled”:true}}’ -isOrganizationDefault $true -DisplayName AuthenticatorAppSignIn
Interestingly, if you have done this in the past, the new Azure AD portal settings for doing this do not take this into consideration. So first, if you have run the above then you need to remove it with Remove-AzureADPolicy –Id <get the ID using Get-AzureADPolicy> before you implement the below, otherwise it is turned on for everyone even though Azure AD Portal says it is not enabled:
So to start, visit the Azure AD Portal at https://portal.azure.com and select Azure Active Directory. Then select Authentication Methods (under Security) and then Authentication Method Policy (Preview) or go directly there with https://portal.azure.com/#blade/Microsoft_AAD_IAM/ActiveDirectoryMenuBlade/AuthenticationMethods.
Click Microsoft Authenticator passwordless sign-in and choose Enable and to pilot choose Select Users and the group you want to pilot with. Otherwise if you want to turn it on for all users, just leave the default. Note that nothing changes for the user – they need to do stuff before it works for them.
As the notice says, also ensure that you have MFA with push notifications enabled. This option has been available for a year or so now, and you will find it on Password Reset > Authentication Methods (or directly with https://portal.azure.com/#blade/Microsoft_AAD_IAM/ActiveDirectoryMenuBlade/PasswordReset). This is not the same setting as the blue bar at the top of the page you are currently on.
For the user, from within Microsoft Authenticator, they need to go to the settings and register the device with their login. This is a one time process and once you have done the above and they have registered the device, they can choose to do password-less sign-in.
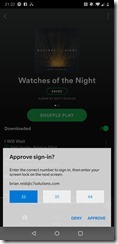
From a login perspective, it looks like this:
- Enter your username to an Azure AD login

- On your phone, in the notification from the Microsoft Authenticator app, you select the displayed number (which changes number, and the position of the number each time)

Hardware Tokens Instead of Passwords (FIDO2)
This is the second option made available in Azure AD in July 2019. This allows the use of hardware tokens such as Windows Hello and FIDO2 devices (i.e. Yubikey and others) to authenticate to the platform. Note that this is not MFA – you have one factor, the hardware token. There is no requirement to implement a second factor with the hardware token as this replaces the password and is not storing a password. That is, if you do not have the token you do not have access – you cannot guess or intercept the token exchange.
To turn on this feature select the FIDO2 Security Key option under Authentication Methods (under Security) and then Authentication Method Policy (Preview).
As with the Microsoft Authenticator option above, Enable the feature and select All Users or Select Users.
Unlike the Microsoft Authenticator option, you now have the choice of Self Service and Key Restrictions
Self Service is useful when you have All Users selected, as the user registers their own security key. Without Self Service you need to configure a key for each user. Self Service requires the new registration service which is mentioned above and linked to at the top of the configuration page in Azure AD portal.
Enforce Attestation allows you to ensure that a specific model / device of hardware security key is used. Enforce Key Restrictions requires that you add the key by its AAGUID as shown:
From here you can also Restrict Specific Keys to only allow keys you have issued to be used. Block would allow you to have any key.
Enhanced Registration Preview
This preview has been available since early 2019, but now supports passwordless and security token as authentication methods. Click the link in the blue bar and ensure everyone whom you have enabled the new authentication policy for is included for the new registration preview. In the graphic below, this is the lower of the two options – your tenant might show only the lower option.
To direct users to the new preview experience visit http://aka.ms/mfasetup or if you have a Conditional Access login but you have not registered, you will be directed here anyway.
On the security info page, if you have already registered for MFA you will be shown your current authentication methods:
If you have not registered before you will be asked to register – either way, you get to pick the methods you want to use for authentication. These need to be:
- Authenticator App – you can add up to five of these
- Security Key
To add a new Security Key select this and follow the steps but make sure you are running Microsoft Edge on Windows 10 1903 or later or Firefox. On Chrome (which supports FIDO2 for Google Services) you get the below:
On a supported browser, you will see the following series of prompts:
The above is for a USB key. NFC keys and readers will have different prompts along the lines of holding the device near to the reader.
Then you need to name your key:
Signing In With A Security Key
Login to Office or your selected cloud app and enter your username and click next.
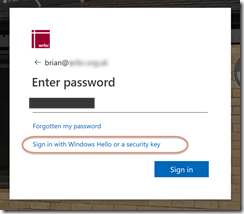
Now you can click “Sign in with Windows Hello or a security key”
As with registration, you now need to enter your PIN and press the button on the USB device, scan your fingerprint, look at your camera or hold your NFC device next to the reader – whatever your device requires you to do.
On your MFA registration page at https://aka.ms/mfasetup your security device is listed:
Your login did not require a password – yippee!


Leave a Reply