
This blog covers the scenario of onboarding new users (or users who have their MFA methods reset) when a passkey is the only required option for authenticating
You might wonder why a passkey only world environment might be set up in Entra ID, and though at the time of writing most administrators and organizations will not be doing this, some will. And if you do this there is some pain to architect around.
This article will take the example of a new account with administrator roles needing to set up a new passkey in a tenant that has a Conditional Access rule that enforces the “phish-resistant” MFA Authentication Strength for privileged admin role holders. The admin roles part of the equation is just a common example, but is not necessarily the scenario you might find yourself in. For example, if all users are required by Conditional Access policy to have “phish-resistant” MFA in use, and the user is a new user with no MFA configured you would be in a similar position. Onboarding an account where passkeys are required without a passkey already in place is a Catch-22 scenario.
So what do we have in place to start with? The tenant has a Conditional Access rule, Rule CA999, that requires a passkey if the user logs in as one of a number different privileged roles. The break-glass account is exempt from this policy.
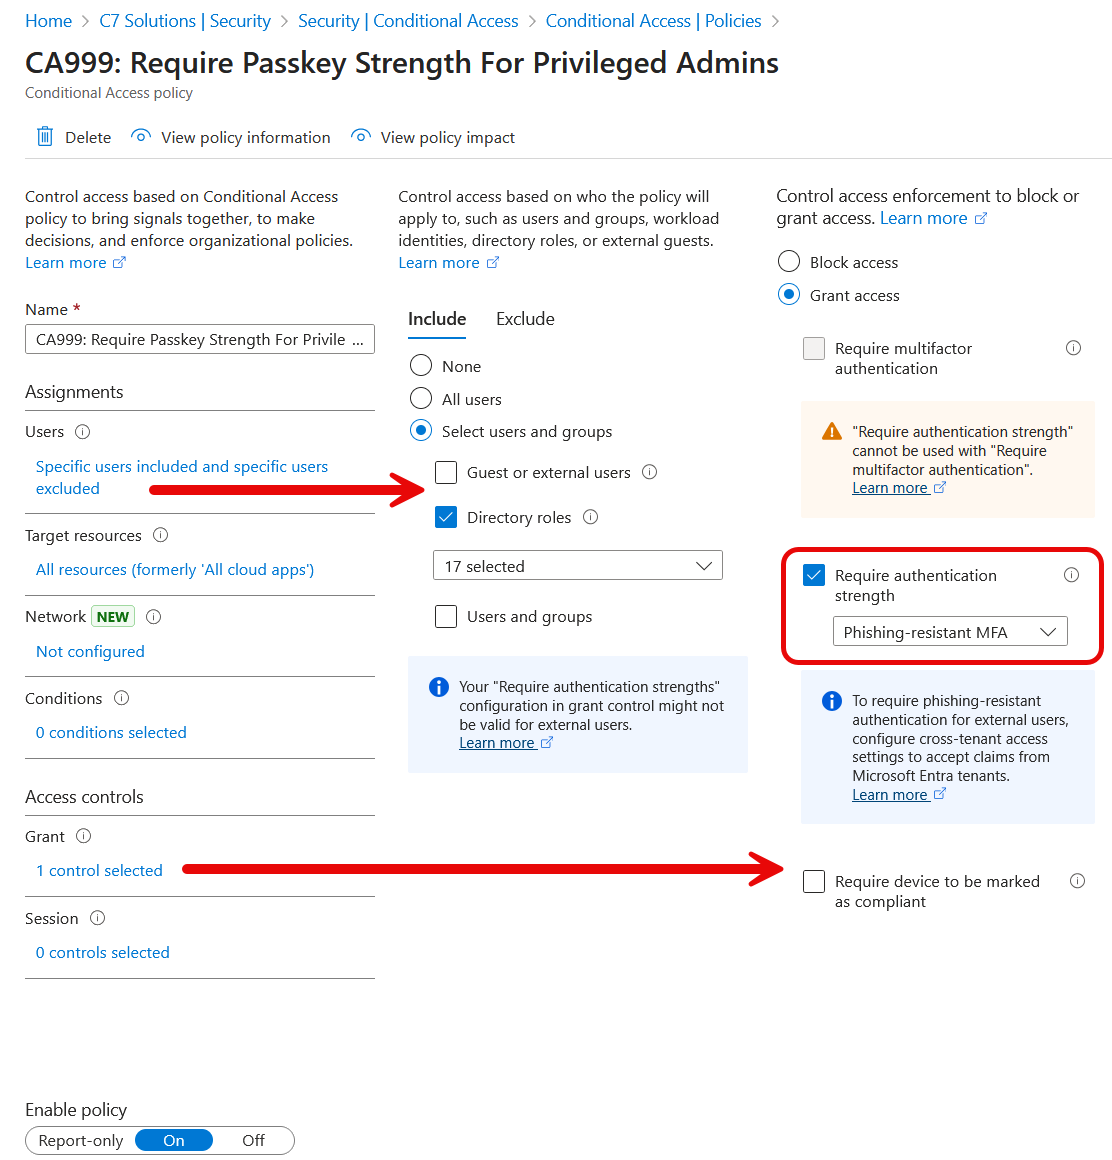
Try logging in to this tenant as a new user with an admin role, you will not be able to as you do not have a passkey, and to register a passkey requires an MFA method on your account, and you cannot register an MFA method on your account because CA999 says “passkeys” (or “phishing-resistant”) MFA only!
This series of steps looks like the following:
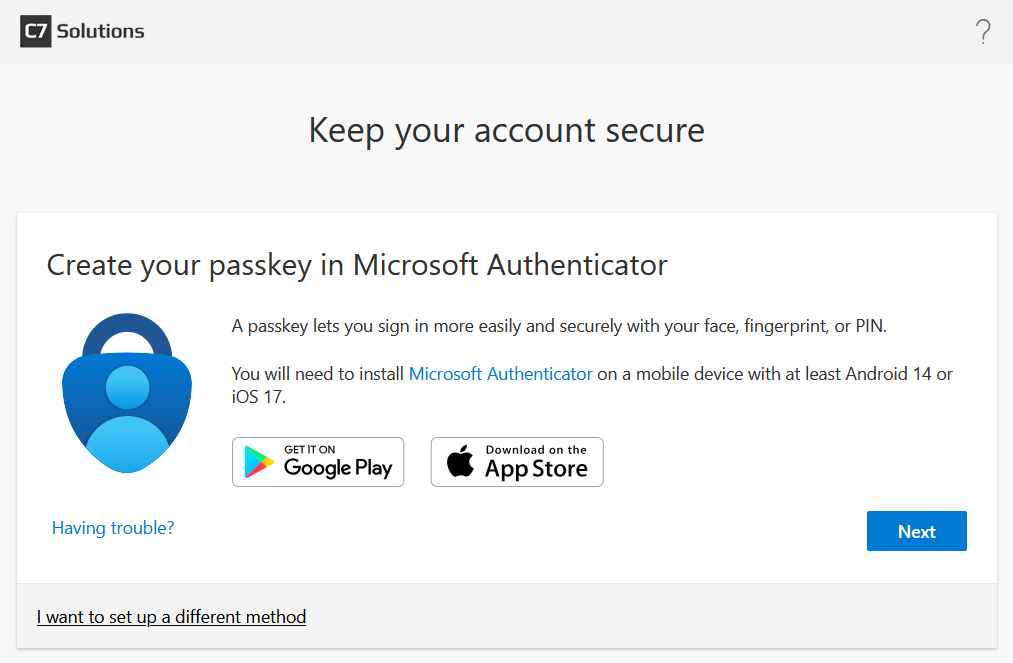
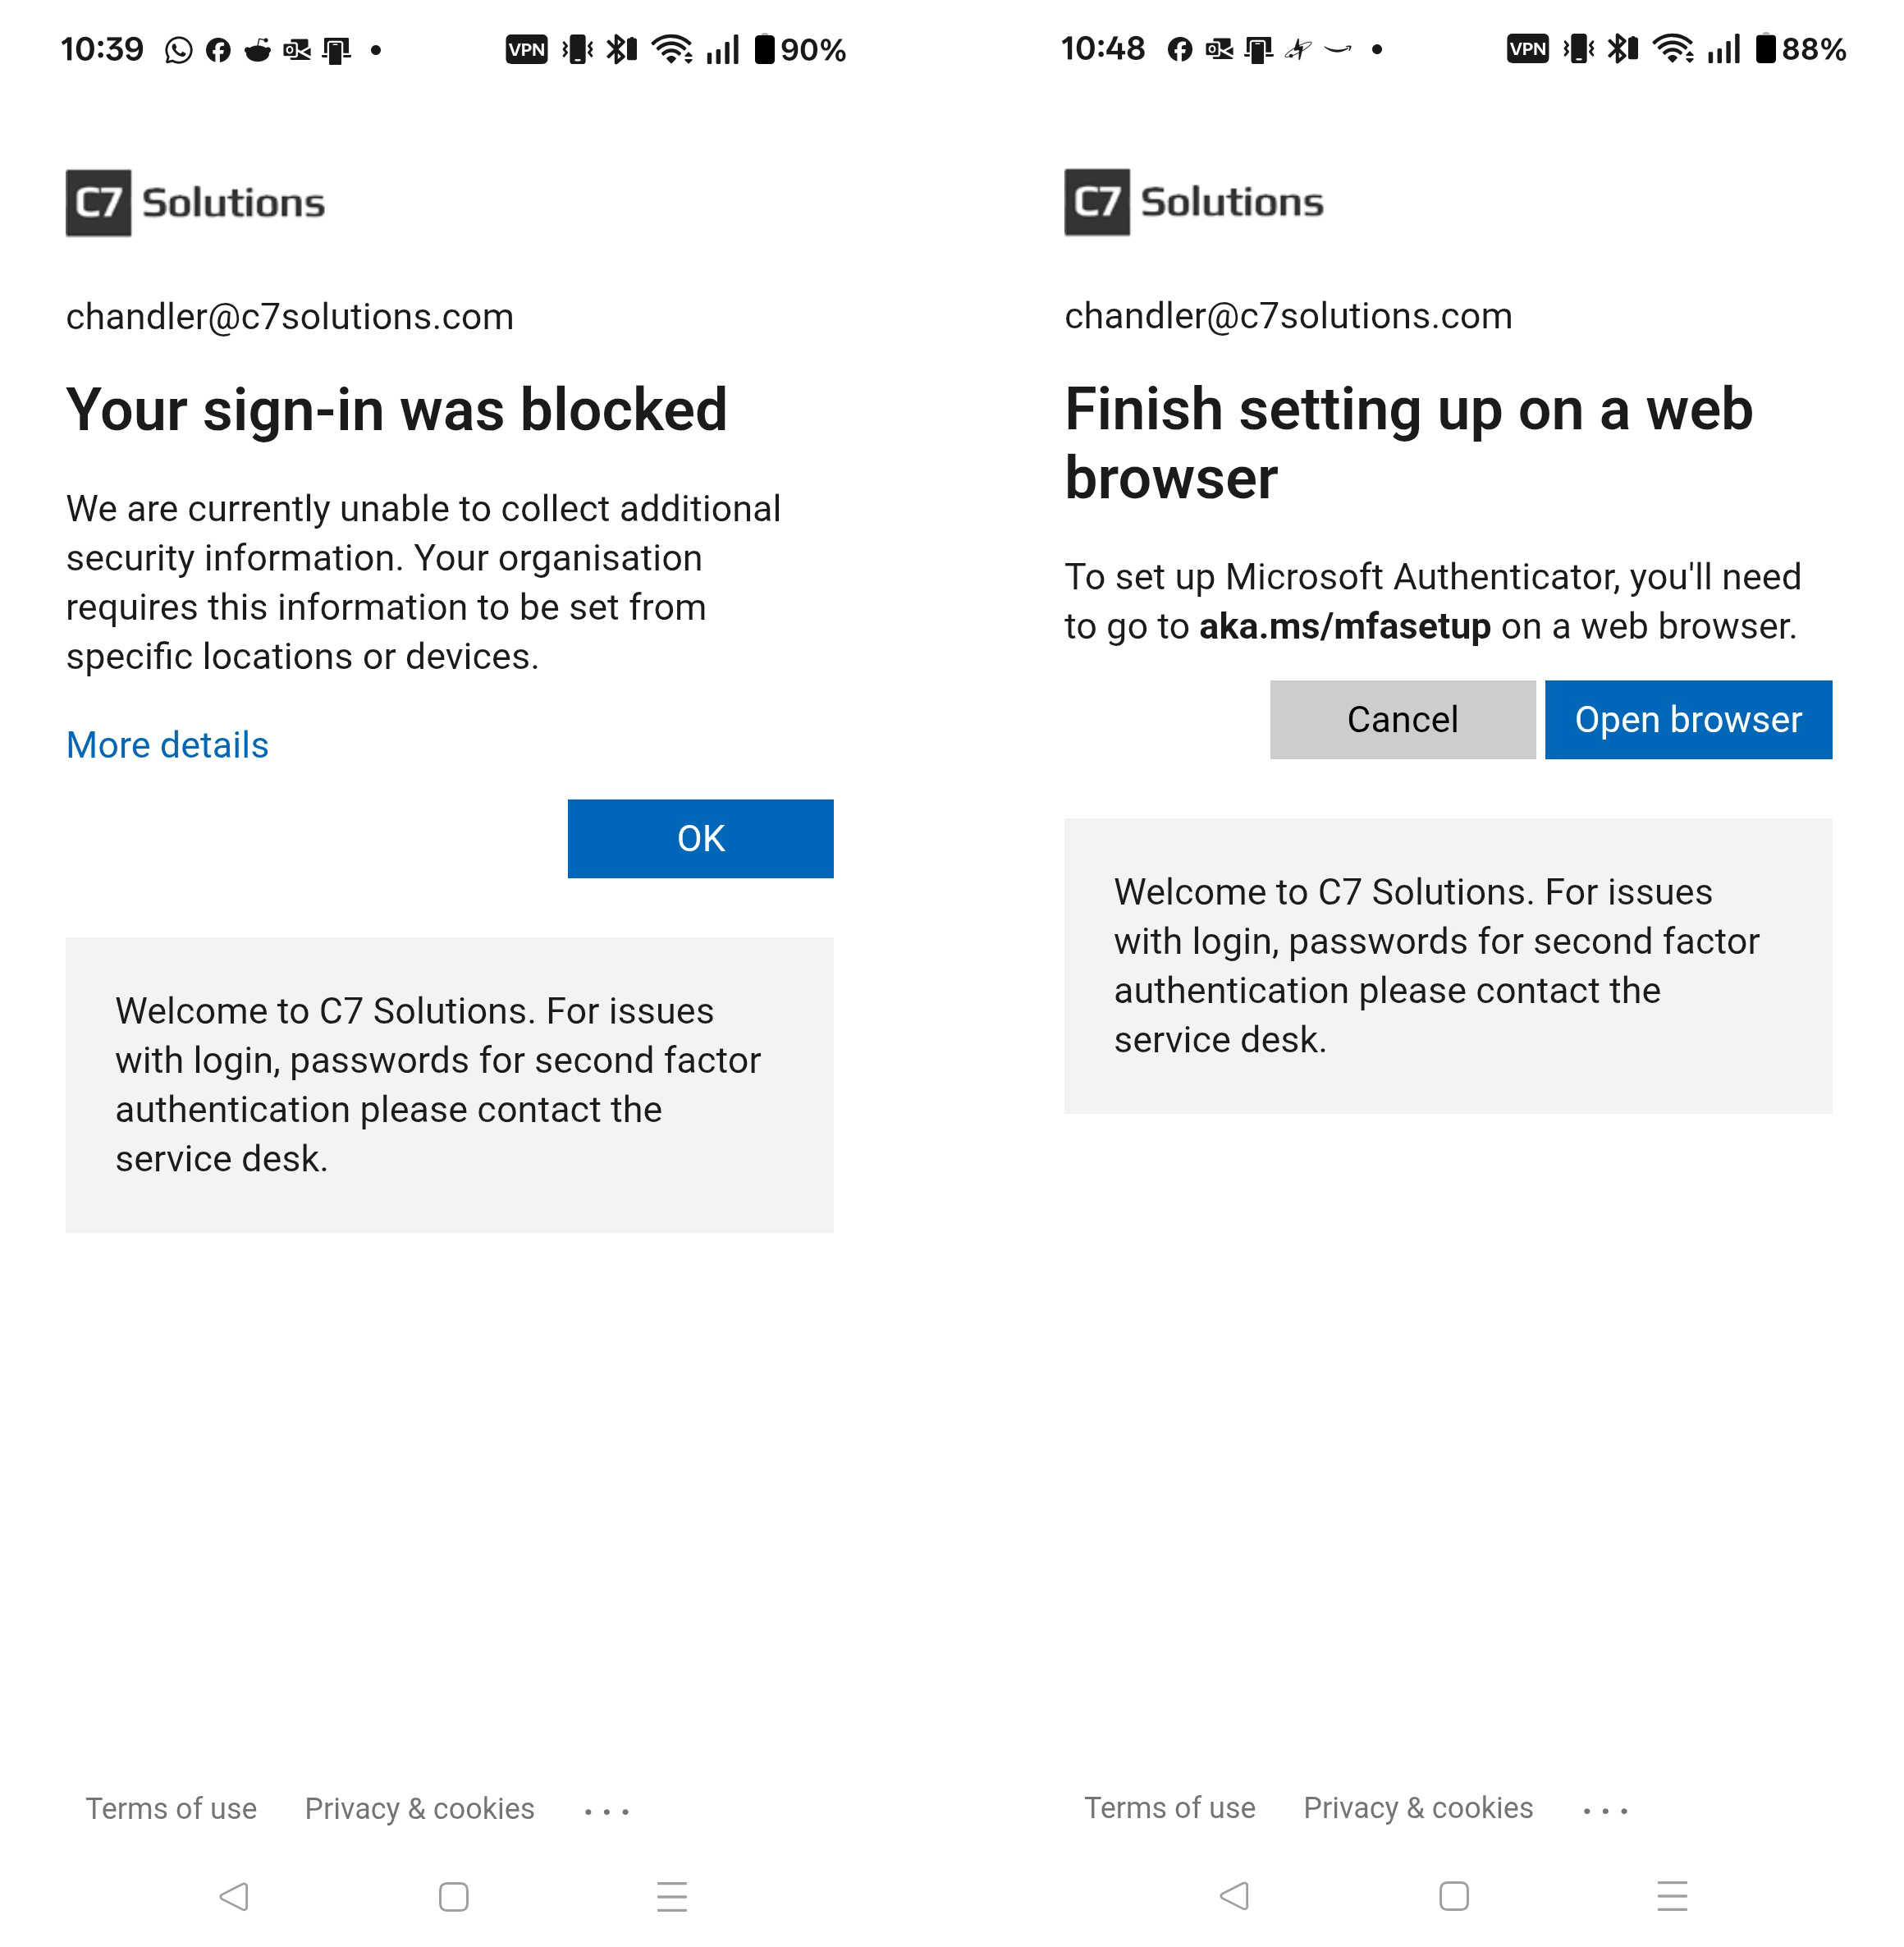
Clicking Next on the above will give a prompt about setting up Microsoft Authenticator and depending upon the settings and the operating system of your phone, you could get different prompts. Some I have seen are below, the first says you can go no further and the second just goes around in a loop!
So what do you need to do? You need to create a second conditional access policy that applies to onboarding or re-registering users (assigned via a group) and requires a custom Authentication Strength that allows for onboarding to happen. Lets take a look:
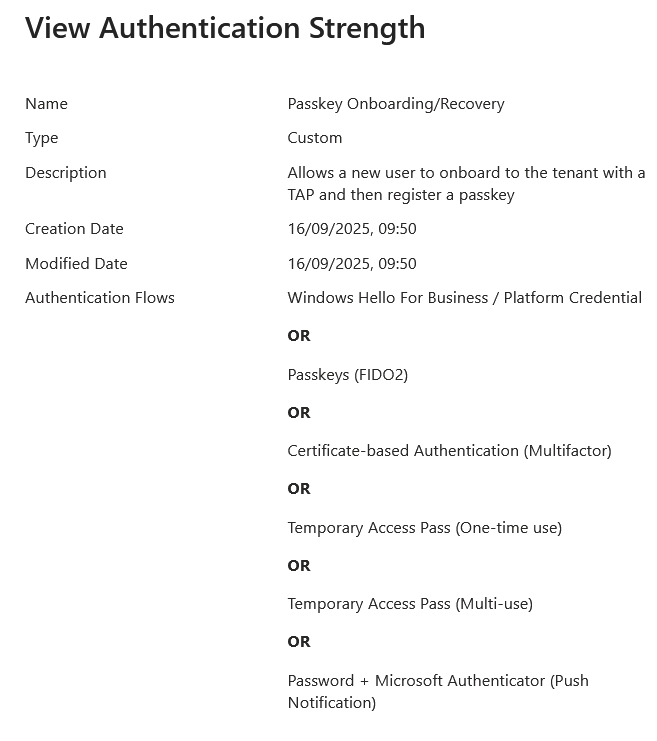
Firstly, the new Authentication Strength. This is made via the Entra ID Authentication Strength page under Conditional Access. In the below picture I called mine “Passkey Onboarding/Recovery” and enabled all three phish-resistant methods and both Temporary Access Pass (TAP) methods and finally “Password + Microsoft Authenticator (Push Notification)”.
Secondly, the Conditional Access policy. In my example I have named this “CA888: Onboarding and Register New Security Info”. It applies to the new users who are onboarding, is configured to “Register security information” (so not targeted at specific apps/resources) and the Grant control is to require the new Authentication Strength created previously.
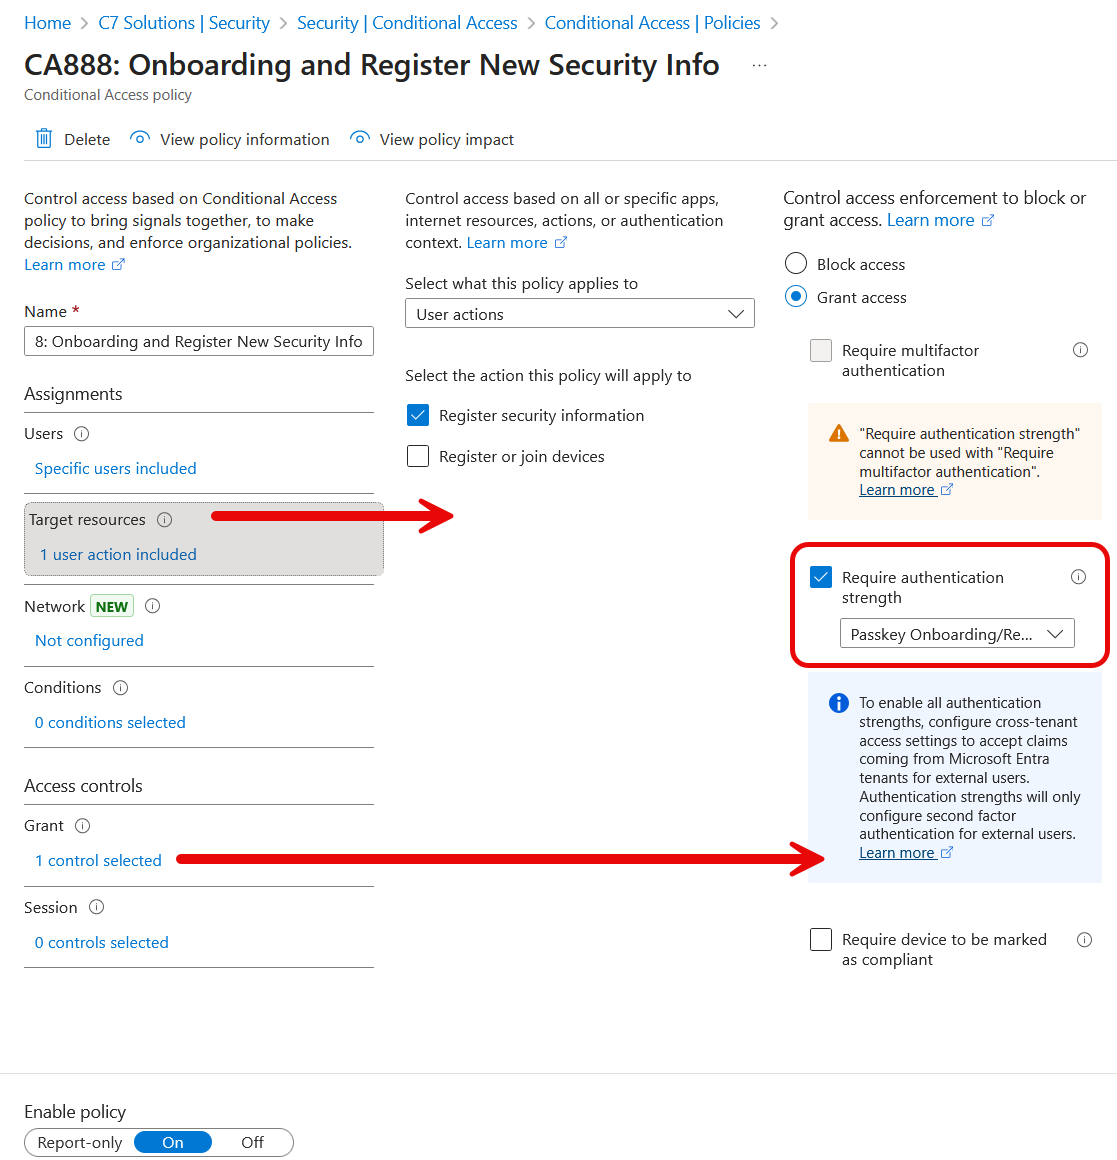
Important: If you have any other conditional access policy that enforces MFA, including my example above of CA999, you need to exempt this from your onboarding users. This is why an onboarding group is useful – you can assign the onboarding group to CA888, the “onboarding” policy and exclude the group from all other MFA configuration policies. If you have policies that restrict location or require compliant device, you do not need to exempt the onboarding group from these, as they can co-exist with the onboarding MFA Authentication Strength policy – its just other MFA policies will get in the way and might block what the user is able to register for.
Once this is in place, and your new user is added to the onboarding policy group (or directly to the conditional access policy) you are ready to prepare the user account for onboarding.
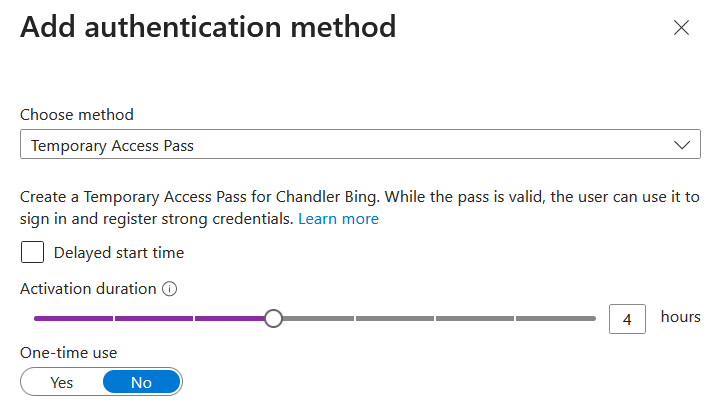
You cannot register for MFA with these policies in place without MFA already being in place, and this seems like another Catch-22. But in this case, the way to get the user into the registration process is to provide the user with a Temporary Access Pass (TAP). This must be a multi-use TAP as you typically need to use it twice at a minimum if all works well. Therefore a single-use TAP will not work in this scenario.
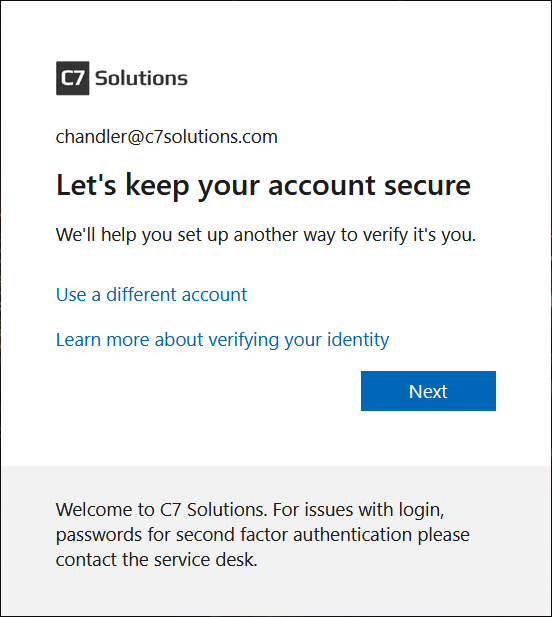
Finally the user can sign in. They need to browse to https://aka.ms/mysecurityinfo and then they will be asked for username and then the TAP. Your login will be blocked if they do not have a TAP and just the password.

Once the user has passed the TAP login screen you will be prompted to keep your account secure – this is known as the “Interrupt Method” for MFA registration, as it interrupts the sign in flow.
You will be asked to register a passkey, and the flow on your phone will also set up the required prerequisite of MFA (by configuring push authentication). I have seen it enable passwordless MFA in Authenticator as well as the passkey. These steps will be initially on your PC and then on your phone. The passkey created will be a cross-device passkey, which is then paired back with your device via a QR code and using the Bluetooth protocol. You can also click “I want to set up a different method” to set up a physical, device bound, passkey.
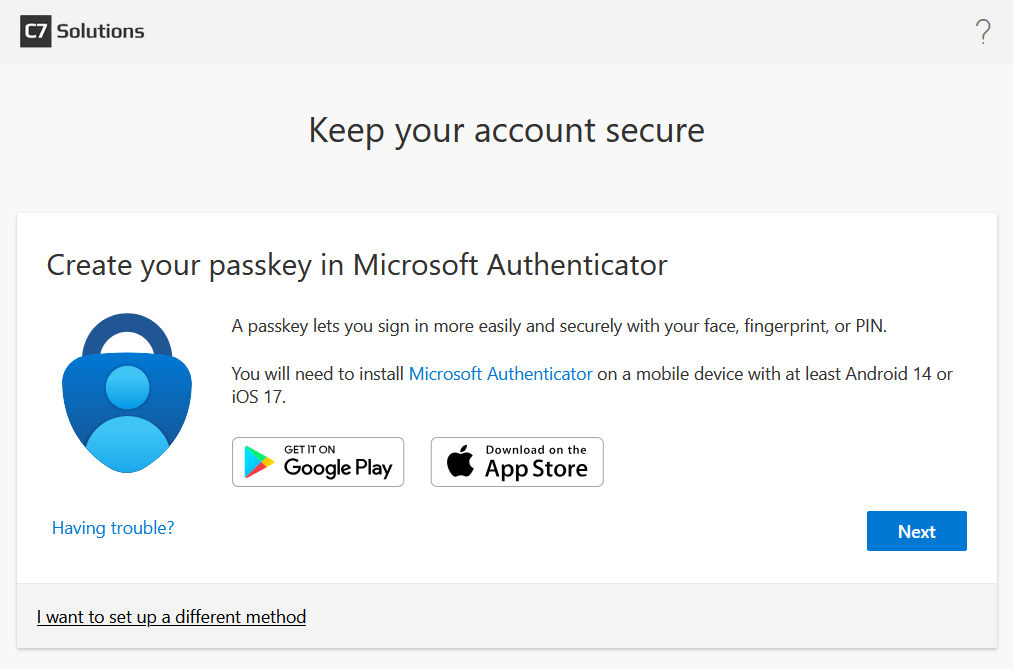
From the above page you click Next. You are now prompted to either install Microsoft Authenticator on your phone or if you are already using Authenticator, to sign-in on the phone and select work or school account. You will need to sign in on your phone with your username and TAP. The user will come back to this page on their computer after the passkey is created on their phone.
Meanwhile, on the phone – once you have selected work or school account and signed in with your username and TAP (not shown, but identical to above pictures) you are prompted to secure your account. You will then see a number of steps happening such as setting up MFA, passwordless (and device registration if that is needed) and then setting up the passkey. You might require biometrics a few times in this process, so fingerprint on Android or Face ID on Apple devices. You are finished when the screen says Account added and a “Done” button.
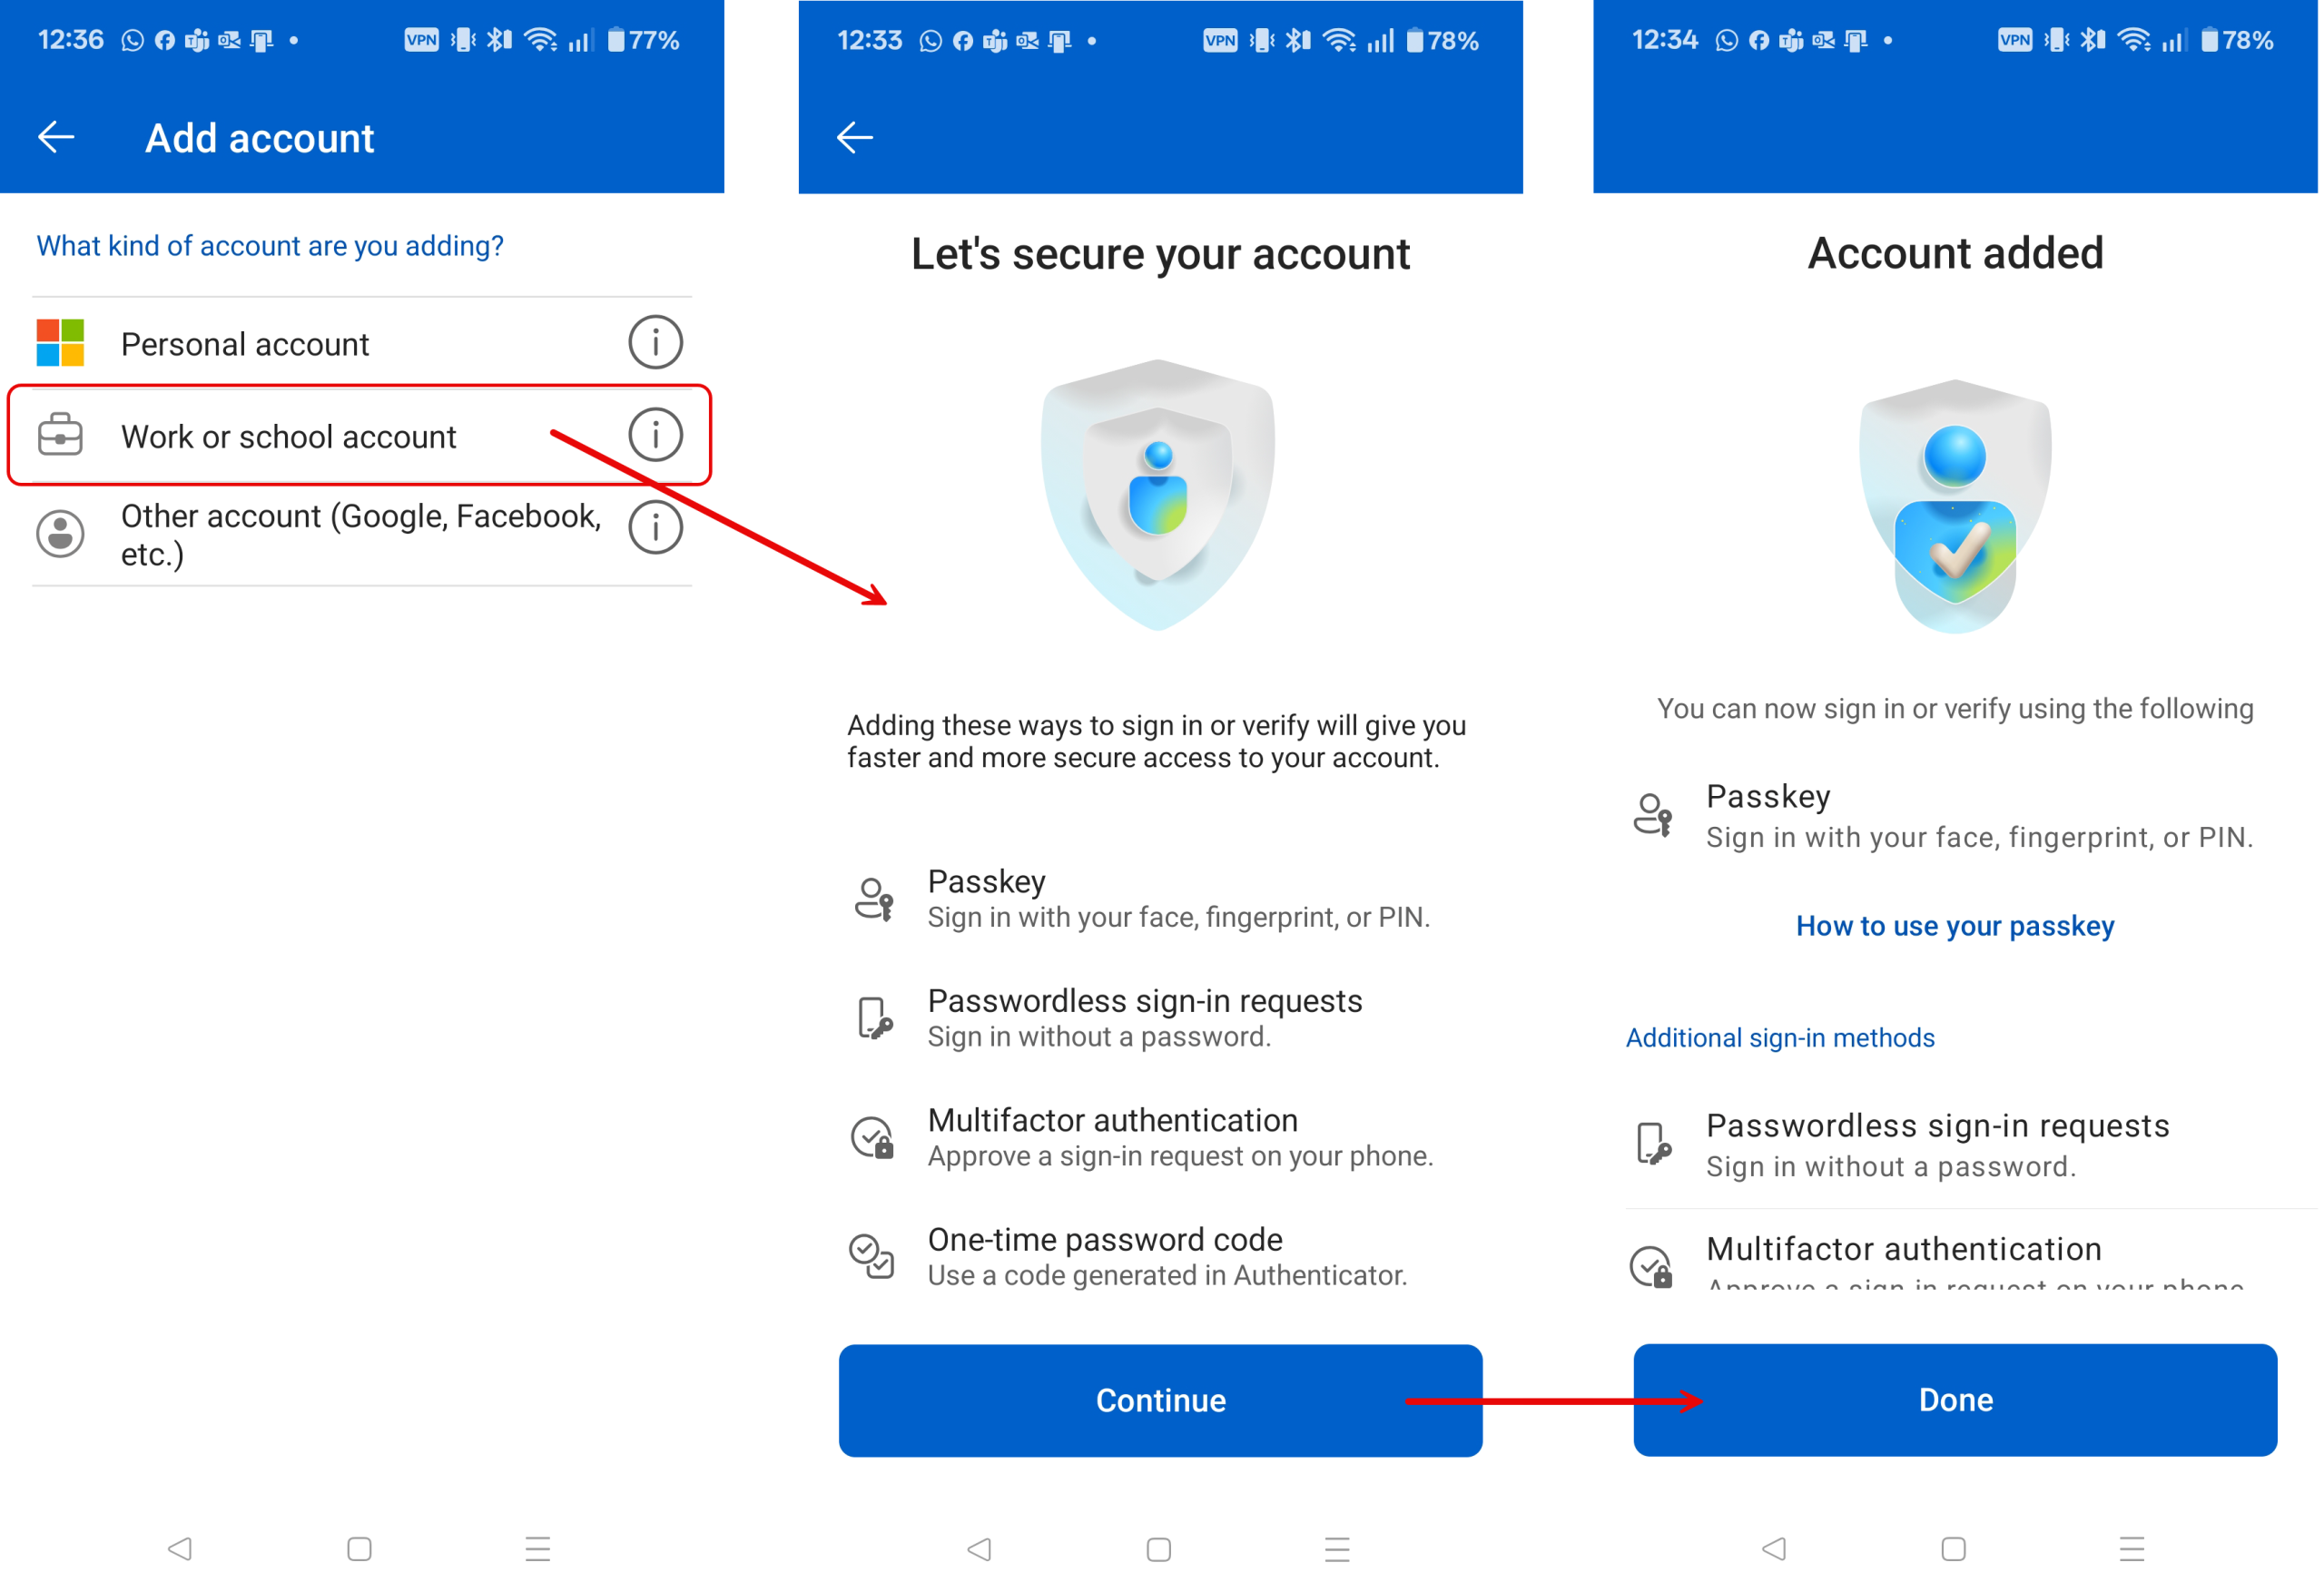
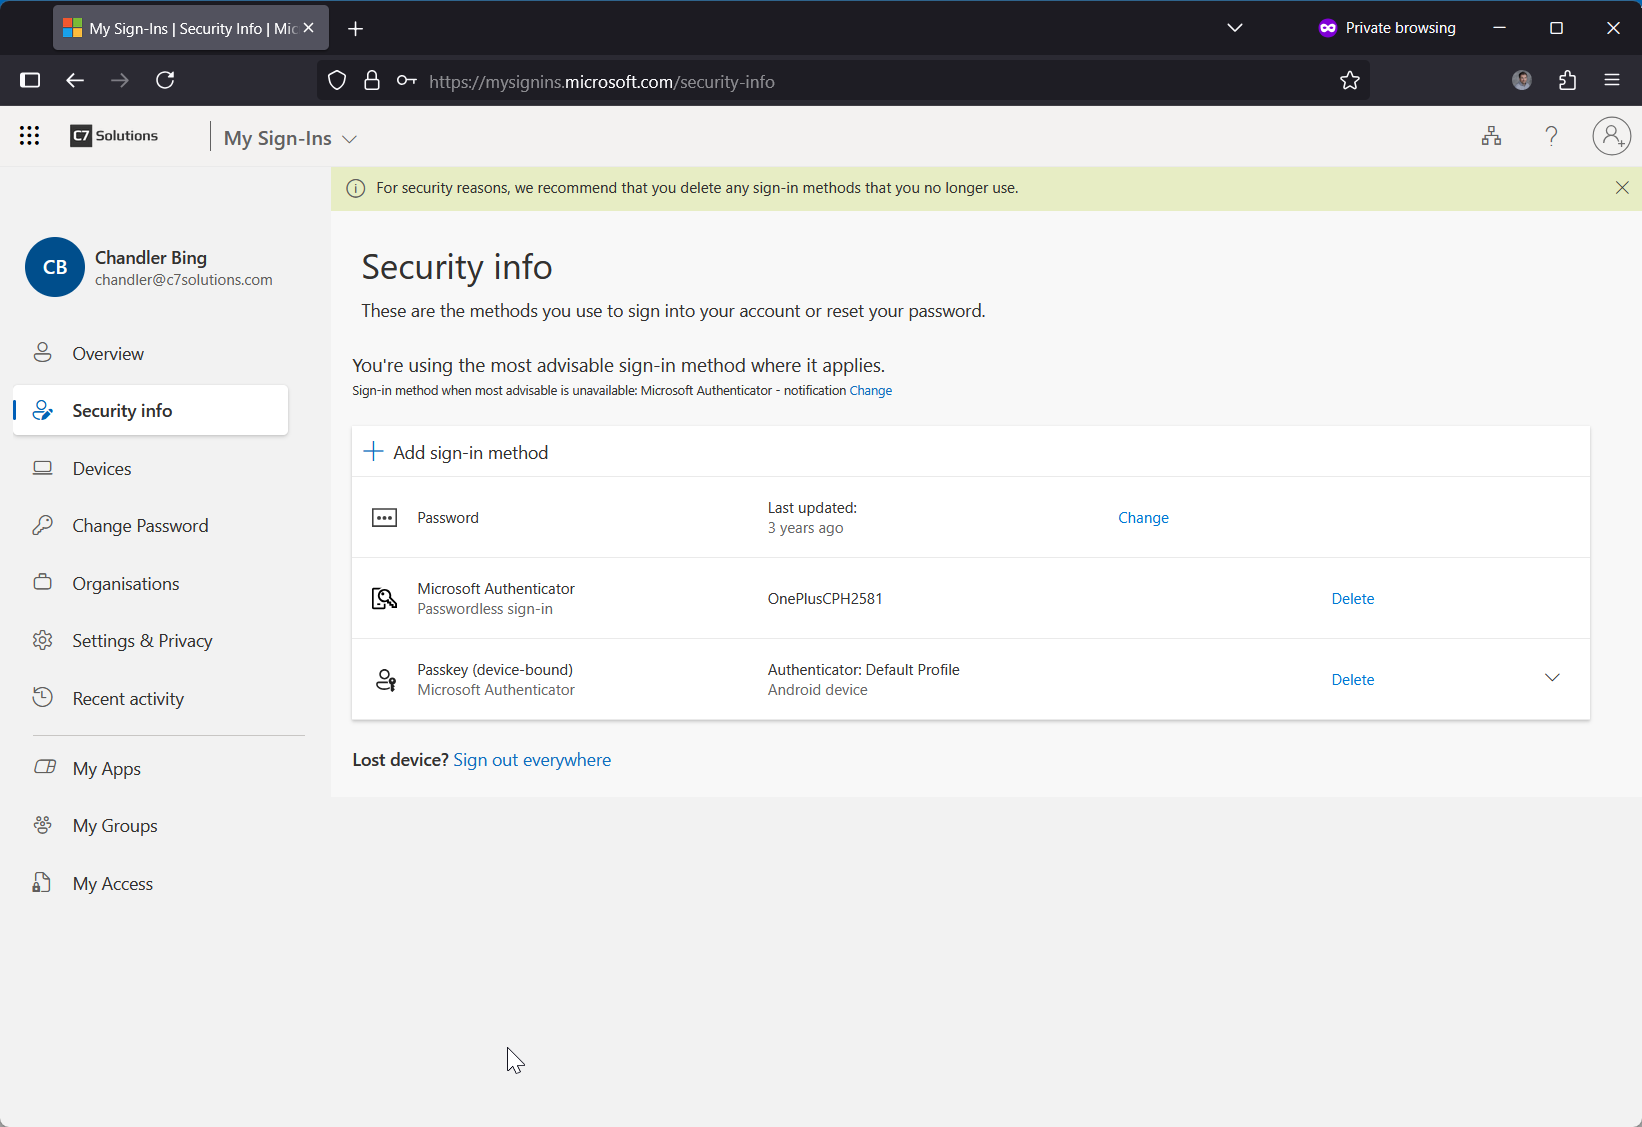
Back on your PC you can now click Next and your passkey is verified and you are taken to your security settings page:
Finally, once the user has created their passkey they can browse to whatever resource they need to use. You the admin now need to remove them from the onboarding group so that the “must use passkey” policy takes effect, as until that time they will be able to access resources without a policy requiring MFA.
This blog post does not cover the steps that the user now needs to do to use their passkey on Microsoft Authenticator, but this is covered in detail elsewhere. They will see a QR code and require Bluetooth on their target device to show proximity to the device and use the passkey on the phone.
If the user opted for a different passkey, aka FIDO2 device bound passkey, then the Bluetooth and cross-device mobile passkey on their phone is not required. But they would need a physical passkey instead.
Leave a Reply