
Conditional Access is well known in its ability to control logins, indeed that is exactly what the name says it does – it puts conditions on access, but now it is also possible to put conditions on actions as well – for example when you want to add an extra layer or protection. This is known as Protected Actions and it can be found in the Roles and Administrators section of the Entra Admin Center (under Identity on the main menu, click “…Show More”).
When you set up a Protected Action, you are controlling behaviour based on invoking a permission. For example, lets say you want to ensure that ensure that cross-tenant partners can only be added via an administrative workstation. At the time of writing there are 19 permissions that can be protected, and they cover groups of actions such as create, update and hard delete some directory objects as well as objects that they can change including conditional access policies, Entra B2B collaboration settings, tenant restrictions, partners, restoring deleted items and network locations.
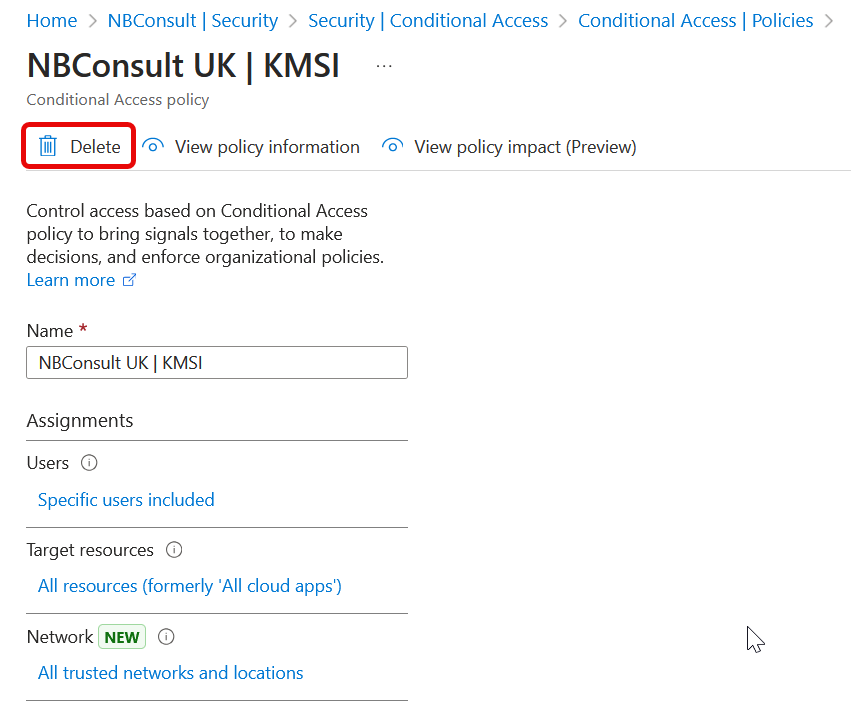
So to enable a protected action, you first need to define the authentication context that will fire when the permission is called, and then choose the permission to tie to this Authentication Context. Authentication Contexts are therefore made first, the Conditional Access policy that uses the authentication context are next. Then you combining the permission to the authentication context to make the protected action, so that is done last of all. In the above example of a “cross-tenant partners can only be added via an administrative workstation” you would need a policy to block access unless (for example) the device was compliant, matched a given filter and was on a trusted network. We will work through another similar example in this article – a Privileged Admin Workstation (PAW) is needed to delete a conditional access policy.
Creating Authentication Contexts
These are found in the Entra Admin Center under Protection/Conditional Access as shown:
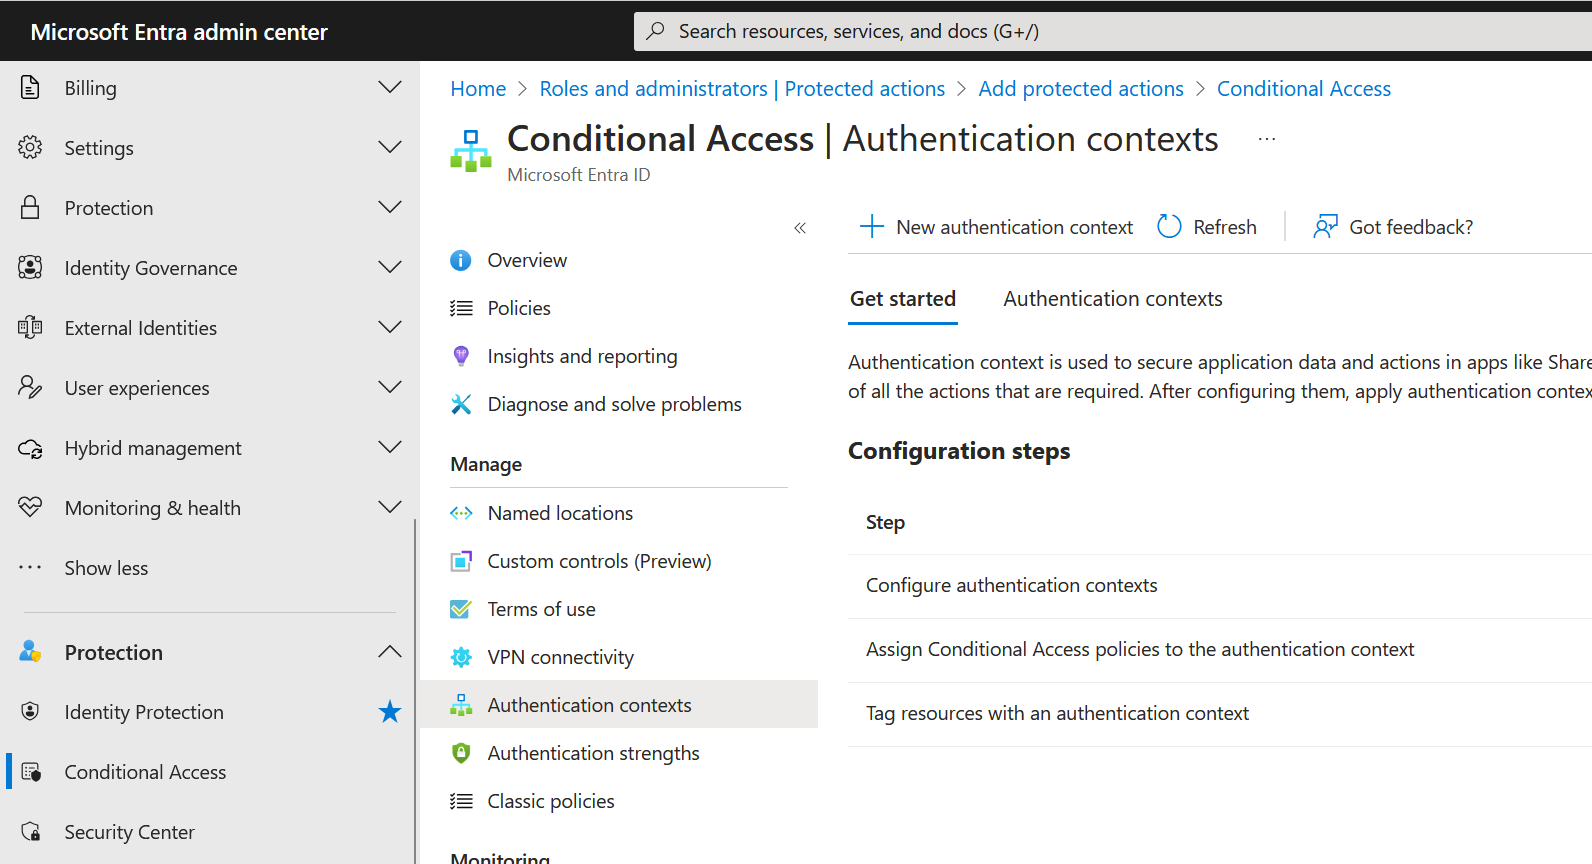
Change to the Authentication Contexts tab and create a new authentication context. You will need a name, a description and one of the 99 IDs that are available (it will only show you available IDs) – but don’t exceed c25 or it will not work:
During writing this blog I started with c99, just because it was an available number, but protected actions only seem to work with c25 and lower, which used to be the largest available number at the start of 2024, but was expanded to 99 from March 2024 onwards.
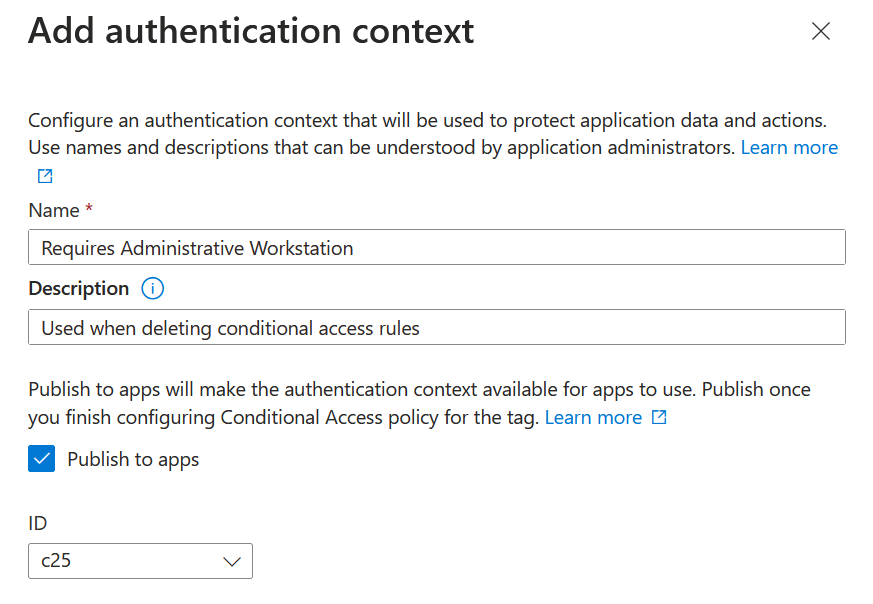
So in the above I created an authentication context with the ID c25 (keeping a record of this value does not matter for protected actions, but some applications might need to know the ID to use when they invoke authentication contexts).
I have called the action “Requires Administrative Workstation” and in the description I have added the protected action I am going to tie the authentication context to, just for clarity in this page. As I add more protected actions to the same authentication context I might want to update the description. I am limited to 50 characters for the name, which the UI does not make clear – so if you fail to save the authentication context just ensure the name you use is short enough.
Also keep the names that you pick more general. So rather than having an authentication context per protected action, app and different SharePoint Online site, you might have one authentication context per control you wish to enforce, for example you might have the following:
- Requires MFA
- Require Phish Resistant MFA
- Requires Trusted Network Location
- Requires Privileged Access Workstation
And then use the relevant one of these with more than one event.
Creating A Conditional Access Policy
The steps here are just like creating any conditional access policy, the only difference is assigning the policy to the authentication context instead of to an app or action.
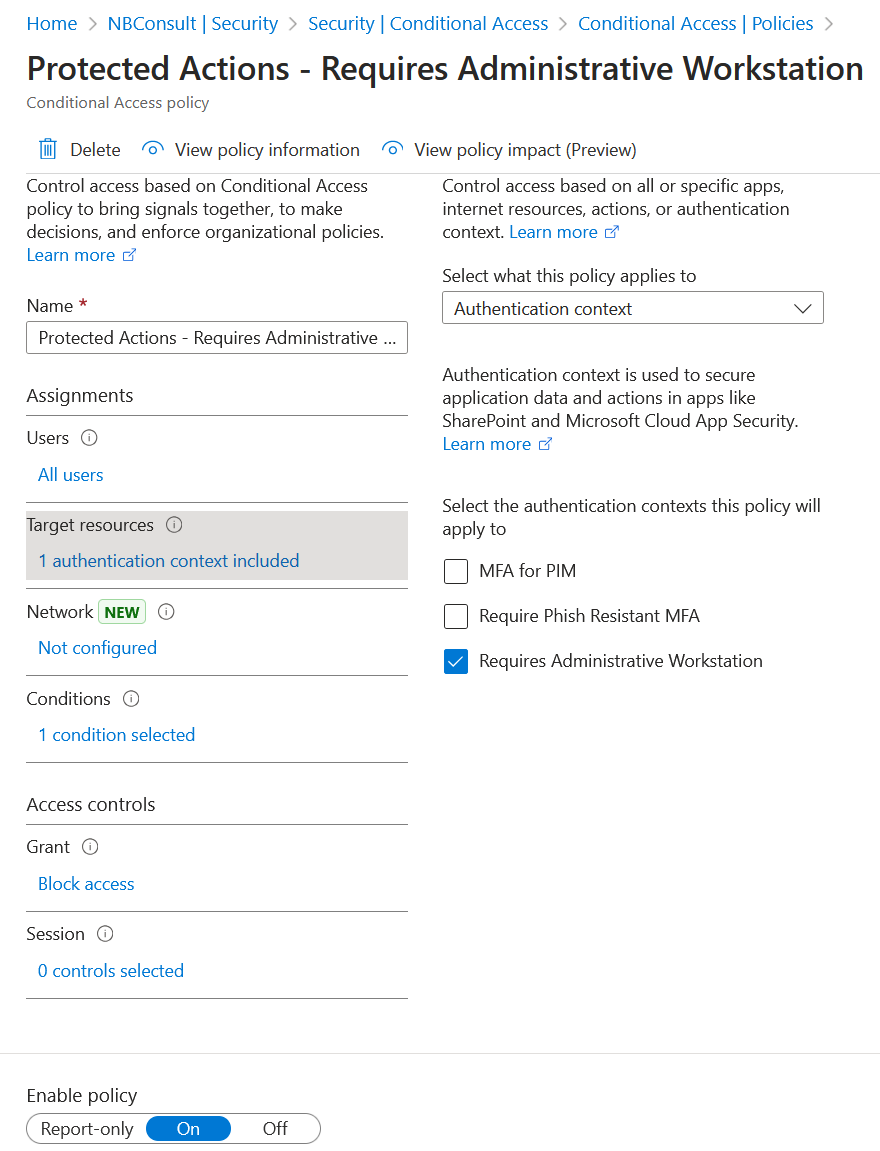
In the above policy, I have done the following:
- Users: All Users
- Target Resources: Choose Authentication Context and pick the context you just created
- Conditions: Filter for Devices: Exclude devices matching the rule device.extensionAttribute1 -eq “PAW” -and device.isCompliant -eq True
- Grant: Block
- State: On
So in my example, when the permission to delete a conditional access policy is called, the device in use must be compliant and have “PAW” as the extensionAttribute1 value. Now might be a good time if you plan to work through this example to ensure your device is compliant and that you have used the Microsoft Graph to add extensionAttributes to devices.
My device that I am using is both compliant and has extensionAttribute1 set to “PAW”. If I attempt to delete a conditional access rule in an in-private browser, that will not pass through device state, so I am also able to test on this device the “other device” scenario.
For notes here, I have intentionally picked this protected action as something I can easily reverse. That is, I can modify both the conditional access policy and the authentication context to stop the protected action working, but I can test it easily by creating and then attempting to delete a conditional access policy – but if I am unable to delete a policy I would be unable to delete the policy I just created above – so in this case I would undo the protected action settings so that I could tidy up my test tenant (you do have a test tenant don’t you?)
Associating Authentication Context With Conditional Access Policy
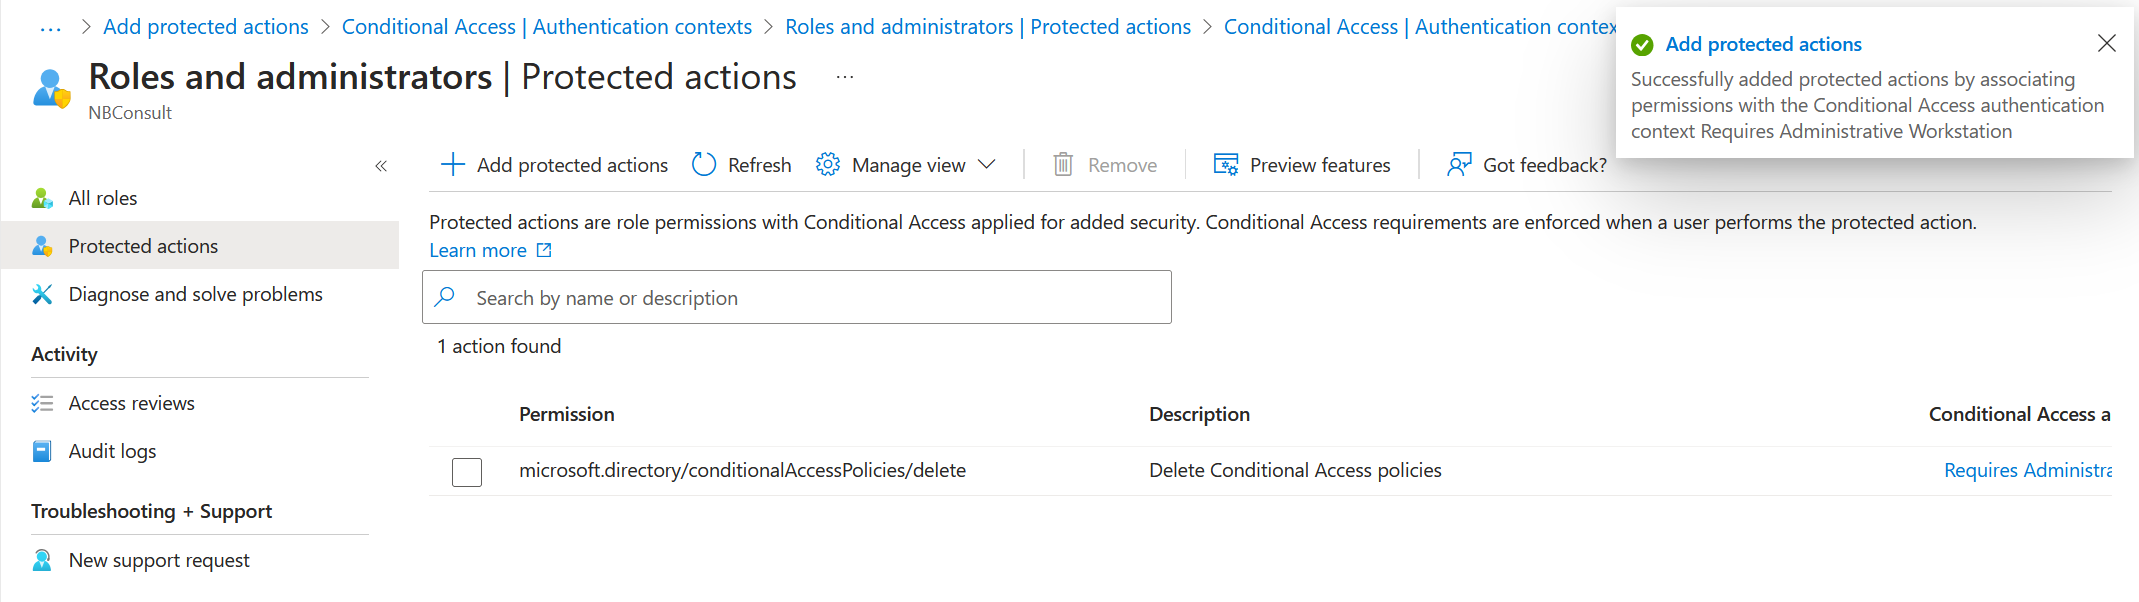
In the Entra Admin Center, return to Protected Actions (Identity/Roles & Admins) and add a new Protected Action by selecting both the authentication context and the permission you want to protect:
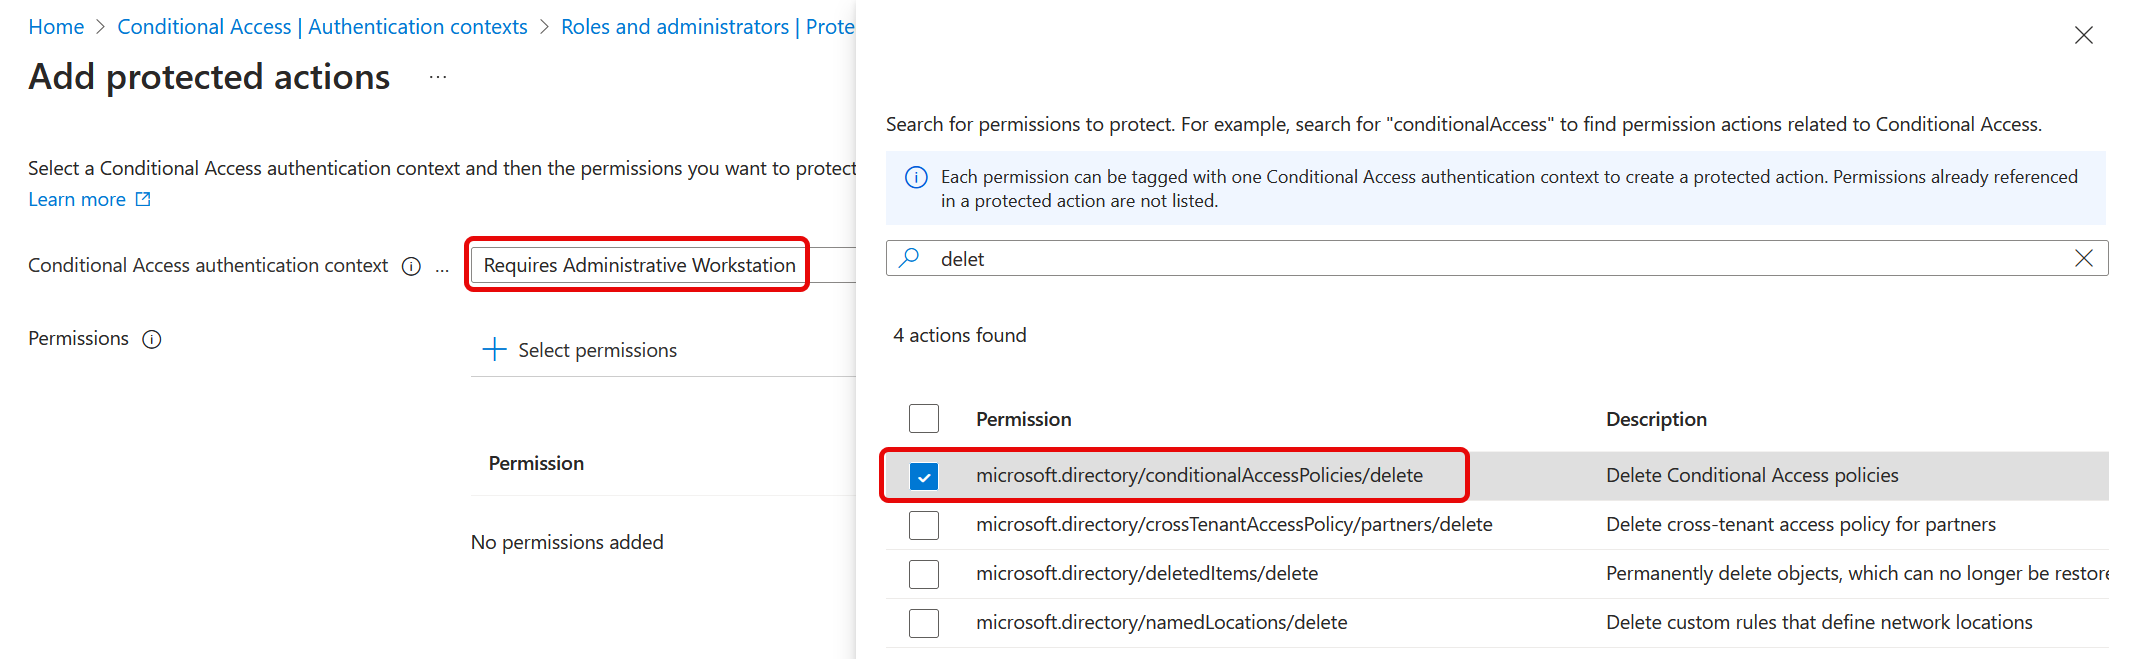
In the above we have selected the authentication context made earlier, called “Requires Administrative Workstation” and the “microsoft.directory/conditionalAccessPolicies/delete” permission.
When trying to save a protected action during the writing of this post I was getting an error that would say that the action had failed:
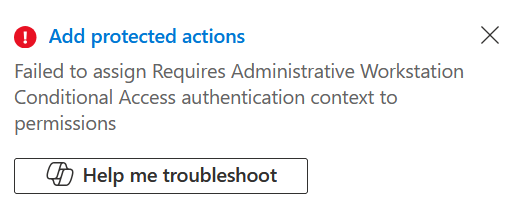
Copilot was of no help, though the audit log had more info – showing “Update conditional access authentication context reference for resource action” and the status reason was “Microsoft.Online.Workflows.ValidationException“. But nothing else and nothing helpful. Eventually through trial and error I got it working, and though Authentication Context IDs were expanded from c1-c25 to c1-c99 in March 2024, I could only use IDs that are in the range c1-c25 for protected actions.
Once I created a new Authentication Context with an ID of c25 and updated my Conditional Access rule to use the new authentication context I was able to save my changes as shown below. I tried an authentication context of c26 and that failed, so I know the range is related to the old min-max and not the expanded range to c99.
Testing Protected Actions
Finally, you can test out your protected action. In my example above I just need to delete a conditional access policy. So looking in my tenant I found an existing policy for browser session control that I no longer needed – so I deleted that. As my workstation has the extensionAttribute1 set to “PAW” the deletion should just work, no questions. So my first test was in an in-private browser session, as that does not pass through device information to Entra ID.
If I did my testing immediately after creating the Authentication Context, Conditional Access rule and Protected Action, it did not work. That is, I was able to delete the conditional access rule.
Trying again 8 hours later and all was working – I got the following error, and remember, in this example an error means success!
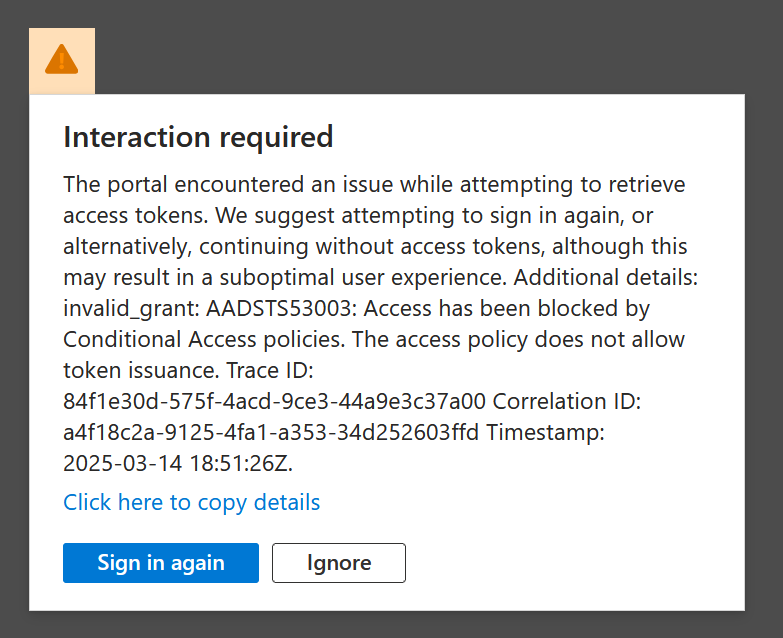
If I was using a compliant device and that device had the correct value for the extensionAttribute1 then the deletion of the conditional access rule would have been successful (note to do this, either use Edge signed in, Chrome with the Windows Accounts extension or Firefox signed in with your Windows account.
Photo by Pixabay: https://www.pexels.com/photo/gray-newton-s-cradle-in-close-up-photogaphy-60582/
Leave a Reply