
I was asked this question last week at Microsoft Ignite following a talk that I did, and as it was a question it was clearly not as clear cut as maybe I thought it was. The question was, “why is Conditional Access found in Azure AD and Defender for Cloud?” (Defender for Cloud was previously called MCAS).
Conditional Access in Azure AD is, in summary, conditions of access following a successful login. That is, you login with your username/password or hardware token and if successful with the login, then the conditions associated with that login session are enforced. These can be as simple at MFA required or more complex. One of the more complex options is to then route the session that you have just authenticated into via Defender for Cloud. This is found on the Session settings for the Conditional Access rule as shown:
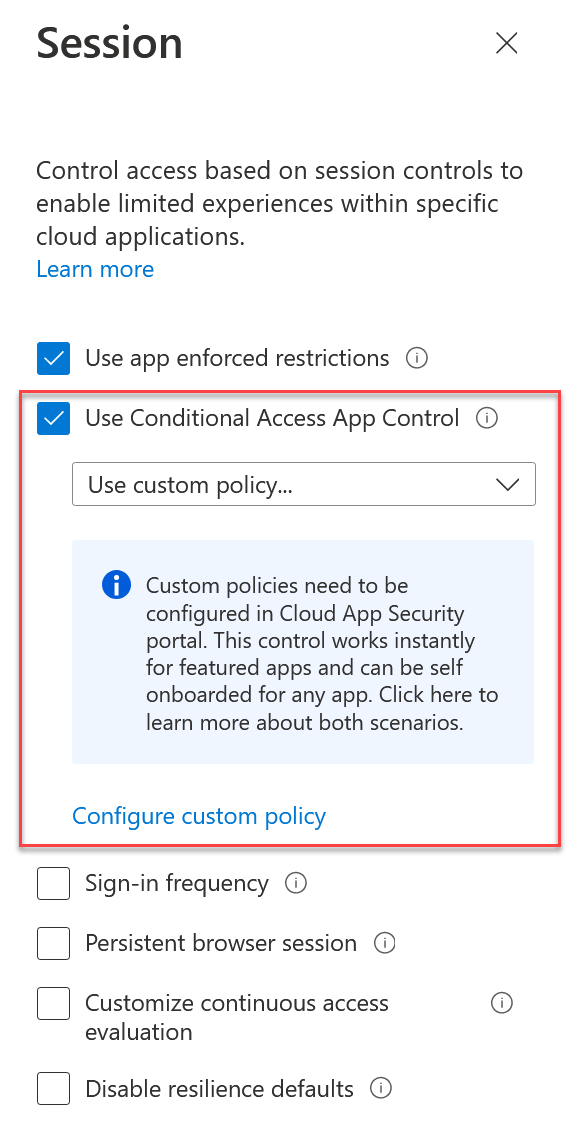
The link in the above to “Configure custom policy” is used to onboard the application into Defender for Cloud and there is a process on this page to do that. For known applications (such as Microsoft 365 apps) the onboarding can be automated just by having an Azure AD Conditional Access rule that applies to yourself only, Office 365 app, and sets the session control to “Monitor Only (preview)” in the above shown picture.
If your app can be auto-onboarded by creating a conditional access rule you just need to login via an in-private browser session (to force a new login) and you will see the following:

The URL for the session should not be the URL you expect but instead https://tenantname-onmicrosoft-com.access.mcas.ms and then https://outlook.office.com.mcas.ms (for Exchange Online), the mcas.ms is added to each domain and so your session is routed through the MCAS reverse proxy.
Once auto-onboarding has happened (and this first run will take longer to complete than other uses of MCAS) or you have manually onboarded your app, you can update your conditional access policy to route your users with the right conditions through Defender for Cloud. For example you might want to block downloads in Outlook, so you could change the app to Exchange Online (rather than all of Office 365 as in the auto-onboarding example above) and pick the built-in “Block Downloads (preview)” in the conditional access session control settings.
If you want more controls, for example to block downloads and cut/copy or encrypt documents when downloaded on untrusted devices etc. then you need to make a custom Conditional Access Defender for Cloud rule, and update your Conditional Access Azure AD rule to route the correct sessions via Defender for Cloud. The Defender for Cloud Conditional Access rules are located in the Microsoft 365 Defender Security Portal at Cloud Apps > Policies > Policy Management > Conditional Access and from here you create a new policy of session type:

For example, take this complex requirement that I recently implemented for a client for Office 365:
- Off-network and untrusted device will have downloads blocked and no cut/copy.
- Off-network and trusted device will have downloads encrypted with a MIP label
- On-network, no restrictions.
To implement this, which I have written in the reverse order from what the client requested (as it makes more sense in reverse!) I needed an Azure AD Conditional Access rule that was for all users, the Office 365 app and excluded trusted networks. This rule implemented the session control shown above, “Use custom policy”. This meant that anyone not on the trusted network ranges was routed to Defender for Cloud.
In Defender for Cloud I created a new “block activities” session control “Session policy” as shown in the immediately above picture and set the activities to app equal to Office 365 and Device not equal to compliant or hybrid join as shown:


I do not need to include the network ranges here, as I am only routing to MCAS when the range is non-trusted as I leave that control check to Azure AD. I can add the network ranges as Corporate IPs though via the Settings cog top right of the admin portal if I need to do that level of checking.
Then I set block as the action. This will block downloads from the web app, and replace the blocked download with a text file that is downloaded and says the user cannot download the document. The document is still visible in the browser, it just cannot be downloaded.
Restricting cut/copy is a second block rule with the same activities but this time added the “Activity Type” equals cut/copy as shown:
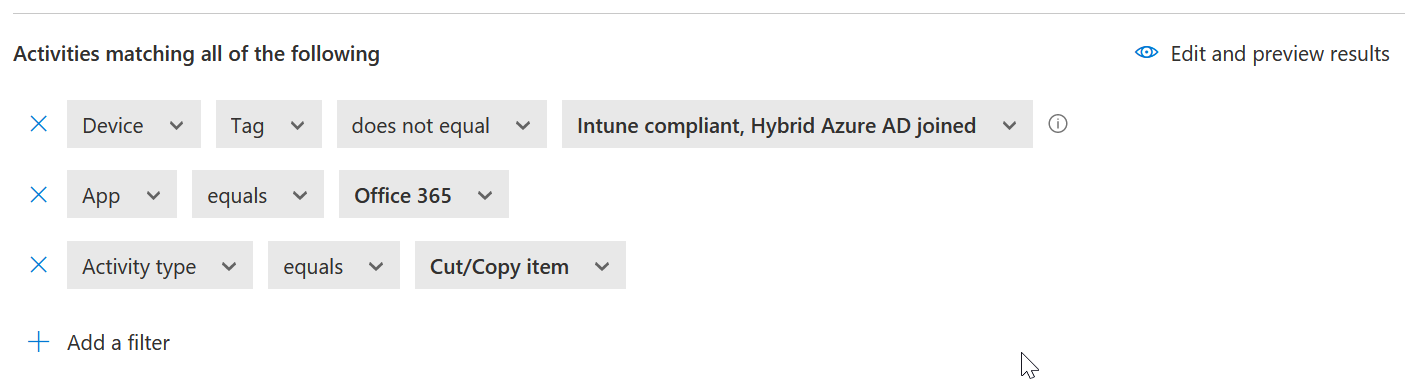
Note that you can block “paste” as well, but that was not my requirement here.
Now that you have Azure AD Conditional Access rules to route users to Defender for Cloud, and Defender for Cloud Conditional Access rules to fire when the session is routed to MCAS via Conditional Access, you can control session data as you require.
Leave a Reply