
This Azure AD feature is something that a number of other Multi-Factor Authentication providers have already implemented – that of showing the location of the user login (and the app in use) on the MFA prompt. This feature rolled out to Azure AD in mid November 2021 in preview – so use in non-production tenants initially until you are happy with the changes.
This update to Azure AD requires the use of Push Notifications and therefore requires the use of the Microsoft Authenticator app. It also requires that MFA is enabled for a set or all users via the Azure AD portal and the “Authentication Methods” page.
So before we start, this is what we would see on the mobile device with just Azure AD MFA push notifications (Android view)
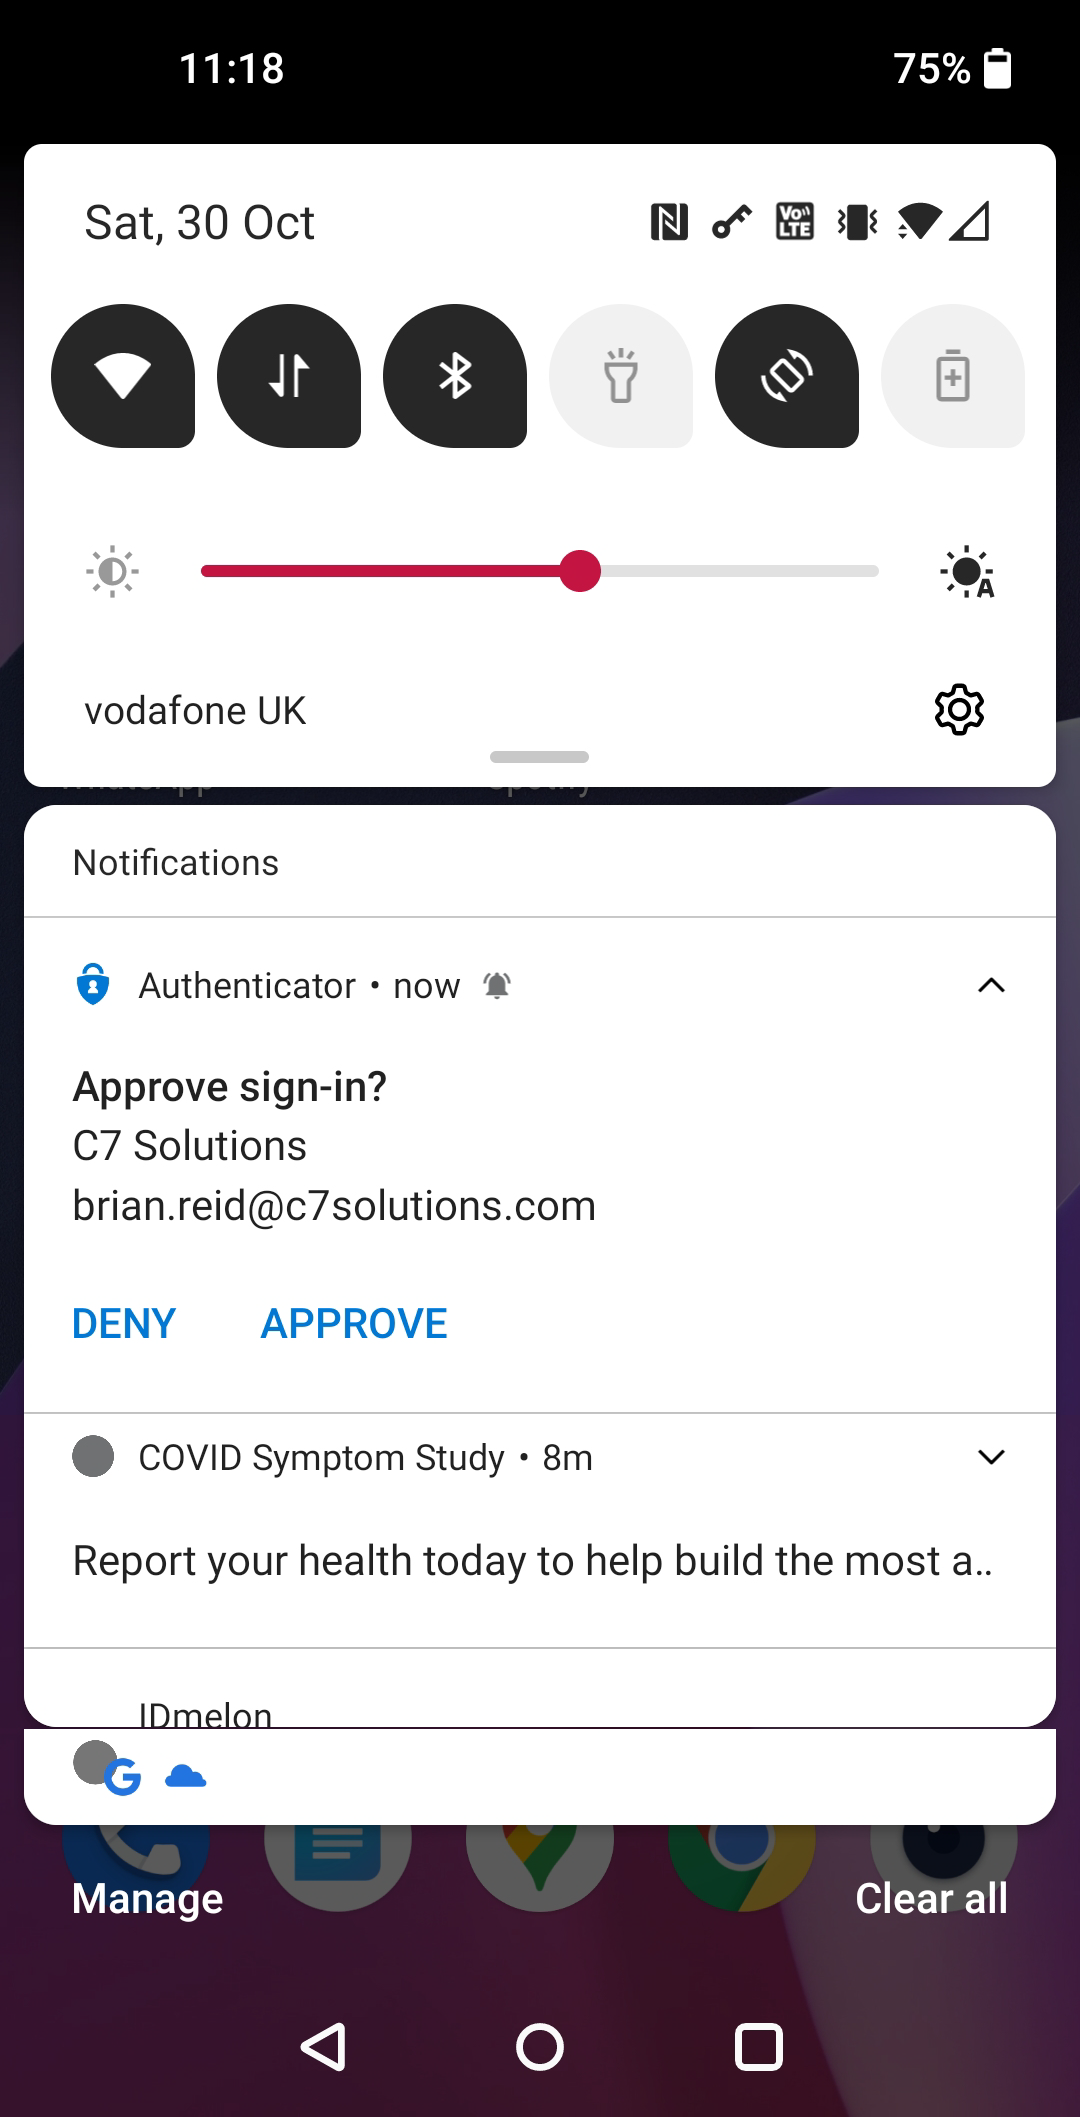
In the above, the user is asked to click Approve (or Deny) with no prior context to who and where the authentication is coming from.
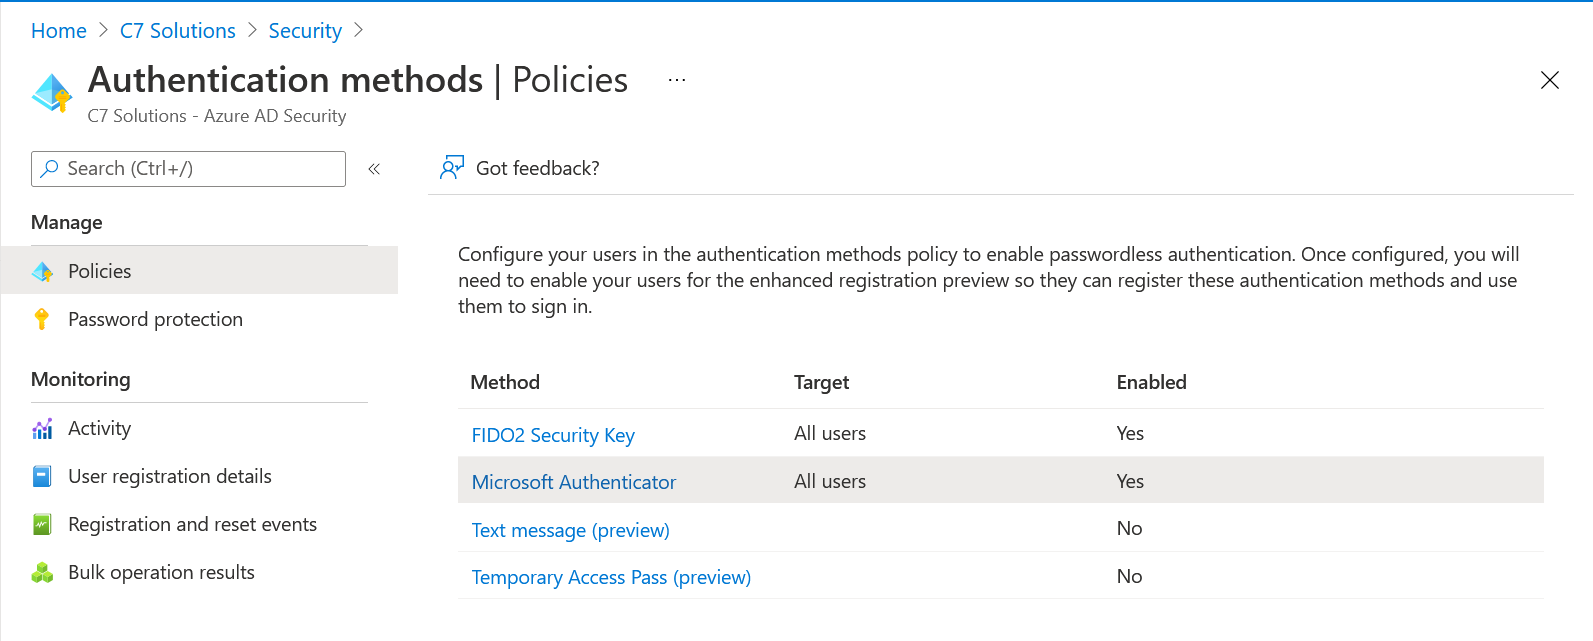
The “Authentication Methods” page in Azure AD is a control that allows you to roll out Push MFA and/or Passwordless authentication to some or all of your users. It is this control that we can update to include the municipal location (i.e. city wide, not street or house level) and another new feature called number match.
To check your Authentication Methods visit https://portal.azure.com/#blade/Microsoft_AAD_IAM/AuthenticationMethodsMenuBlade/AdminAuthMethods (AAD Admin Portal at https://portal.azure.com > Security > Authentication Methods
Here you will see a number of rows, and we are interested in the Microsoft Authenticator row. By default this is turned off (impacting no users) and we are going to turn it on for everyone. This one change will have no impact on your users if they already have MFA in place, but if they already chose the passwordless option on their mobile device they would be enabled for no-password sign-in with this change (you could customise the “Authentication Methods” policy for Microsoft Authenticator to turn this off, but as going passwordless is a user decision there is no prompts or change to behaviour just by enabling “all users” for the Microsoft Authenticator policy at this time.
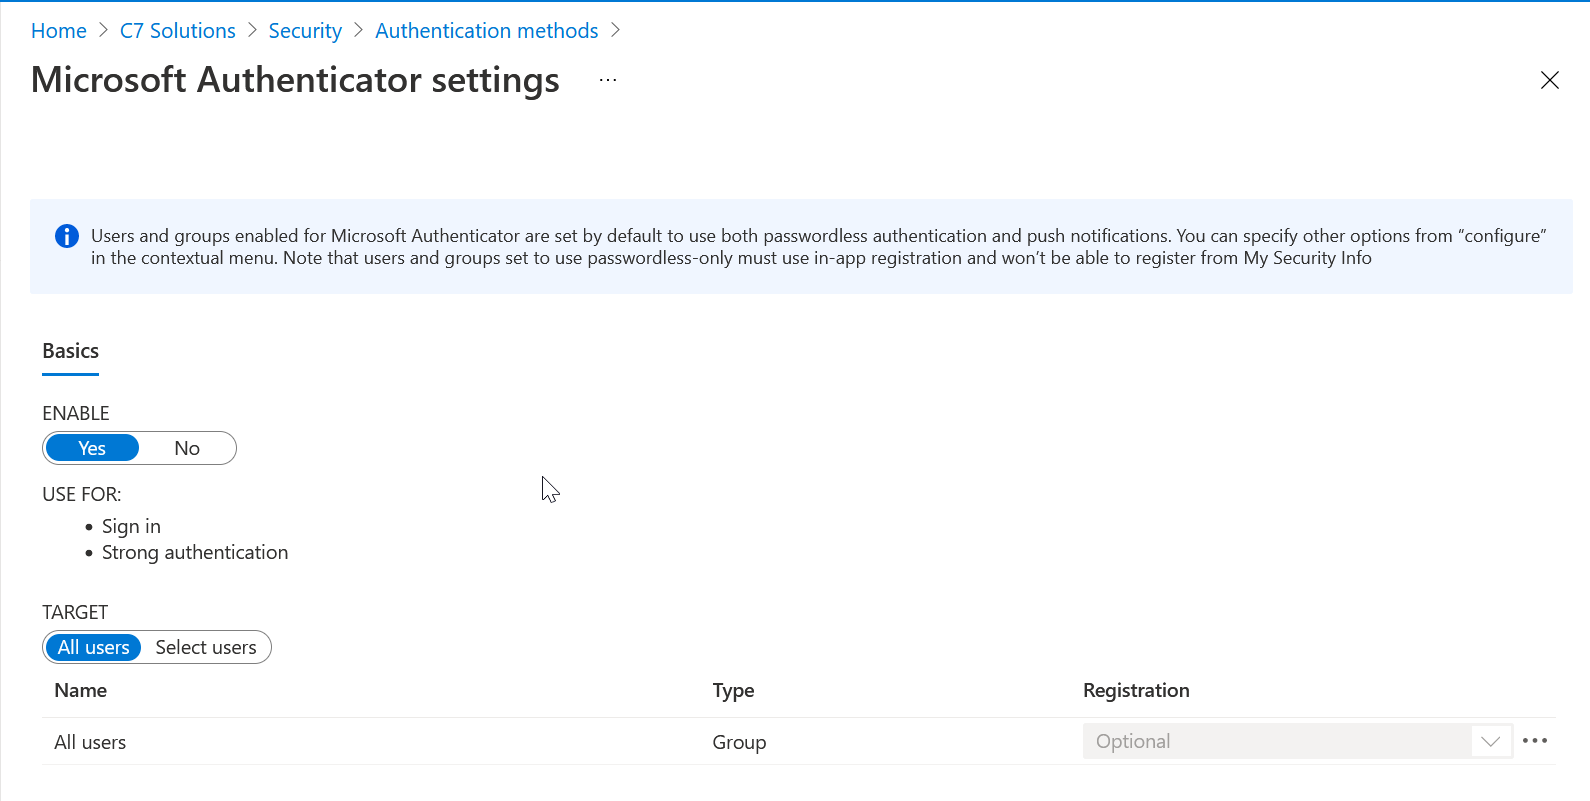
To enable “All users” just select “Enable” if it is not enabled and then “All users” for the Target. If you select a group so you can pilot this change, the below settings will impact the group and not all users. The elipsis (…) on the right is where you can change the defaults to disable push or passwordless and to enable the feature discussed in this blog post.
The default Authentication Mode is “any” and this allows the user to do push MFA or passwordless authentication with the Microsoft Authenticator app. You also now have two other options, “Require Number Matching” and “Show additional context in notifications”. It is this second option that turns on the display of the login location in the Microsoft Authenticator app. Set this to enable to turn this feature on:
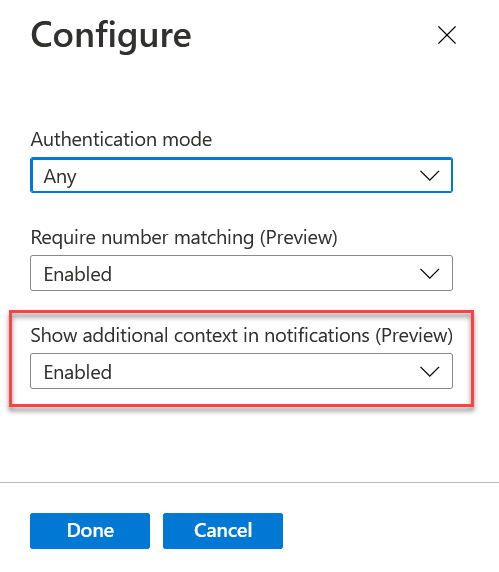
Users will get the additional context for their login in their push notifications in the Microsoft Authenticator shortly after saving these changes.
You can also set these changes via the Microsoft Graph. This will allow you to do this programatically. The Microsoft Graph Explorer can be found at https://developer.microsoft.com/graph/graph-explorer (or https://aka.ms/ge):
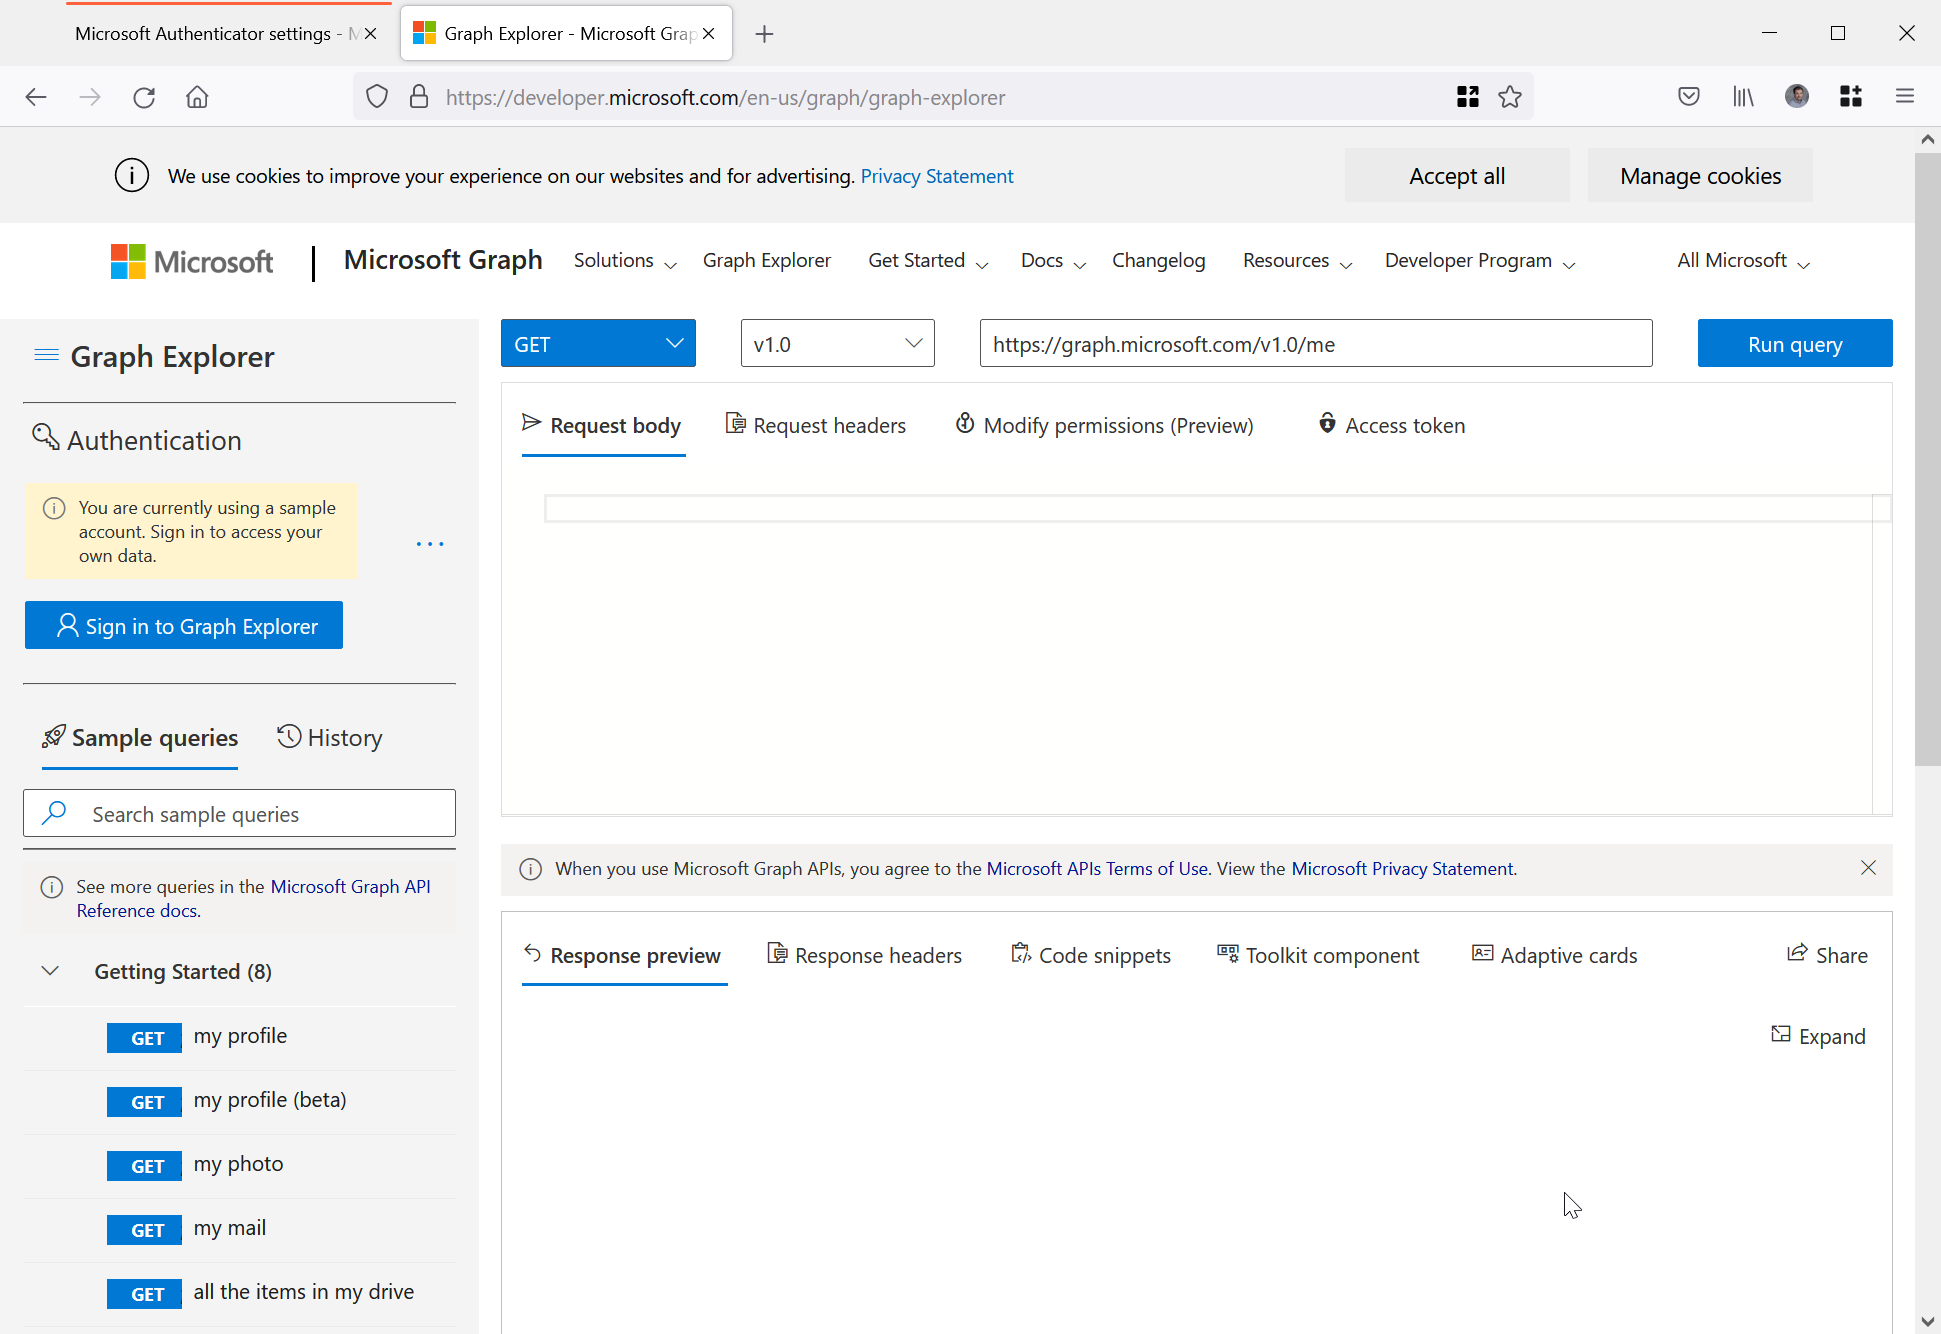
The following are the steps to turn on municipal level location in Microsoft Authenticator for Push MFA and Passwordless notifications.
- Sign in as your Global Admin account on the left of the Graph Explorer
- Change the version control to “beta” and enter https://graph.microsoft.com/beta/policies/authenticationMethodsPolicy/authenticationMethodConfigurations/microsoftAuthenticator as the path to query, as shown:
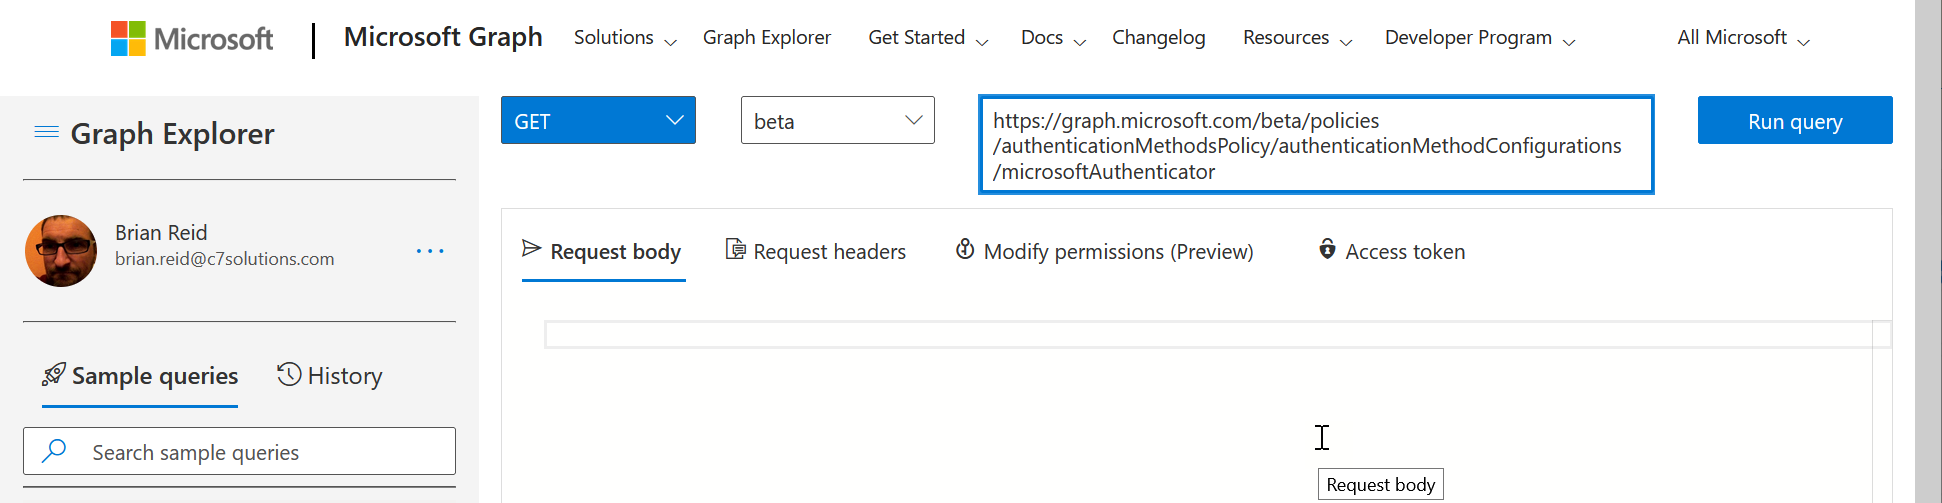
- Run Query – it will probably fail and tell you “Forbidden – 403 – 191ms. You need to consent to the permissions on the Modify permissions (Preview) tab”.
- Select the “Modify Permissions (preview)” tab to see the permissions you need to do this query and to consent to them, as shown:
- Click Consent. You do not need to consent for the entire organization as only you are reading and setting these properties for microsoftAuthenticator. The consented permission is Policy.ReadWrite.AuthenticationMethod.
- Run the query again and now you get a response in the “Response Preview” at the bottom of the Graph Explorer. This is a piece of JSON as shown:
{
    "@odata.context": "https://graph.microsoft.com/beta/$metadata#authenticationMethodConfigurations/$entity",
    "@odata.type": "#microsoft.graph.microsoftAuthenticatorAuthenticationMethodConfiguration",
    "id": "MicrosoftAuthenticator",
    "state": "enabled",
    "includeTargets@odata.context": "https://graph.microsoft.com/beta/$metadata#policies/authenticationMethodsPolicy/authenticationMethodConfigurations('MicrosoftAuthenticator')/microsoft.graph.microsoftAuthenticatorAuthenticationMethodConfiguration/includeTargets",
    "includeTargets": [
        {
            "targetType": "group",
            "id": "all_users",
            "isRegistrationRequired": false,
            "authenticationMode": "any",
            "outlookMobileAllowedState": "default",
            "displayAppInformationRequiredState": "default",
            "numberMatchingRequiredState": "default"
        }
    ]
}
- Here we can see the settings for the “Authentication Methods/Microsoft Authenticator” control we enabled.
- We are going to change the displayAppInformationRequiredState from “default” to “enabled” to turn on MFA and passwordless location in the sign-in prompt.
- Copy the whole JSON from your results page (not mine above!) and paste it into the “Request Body” in the middle of the Graph Explorer, as outlined with the red box below
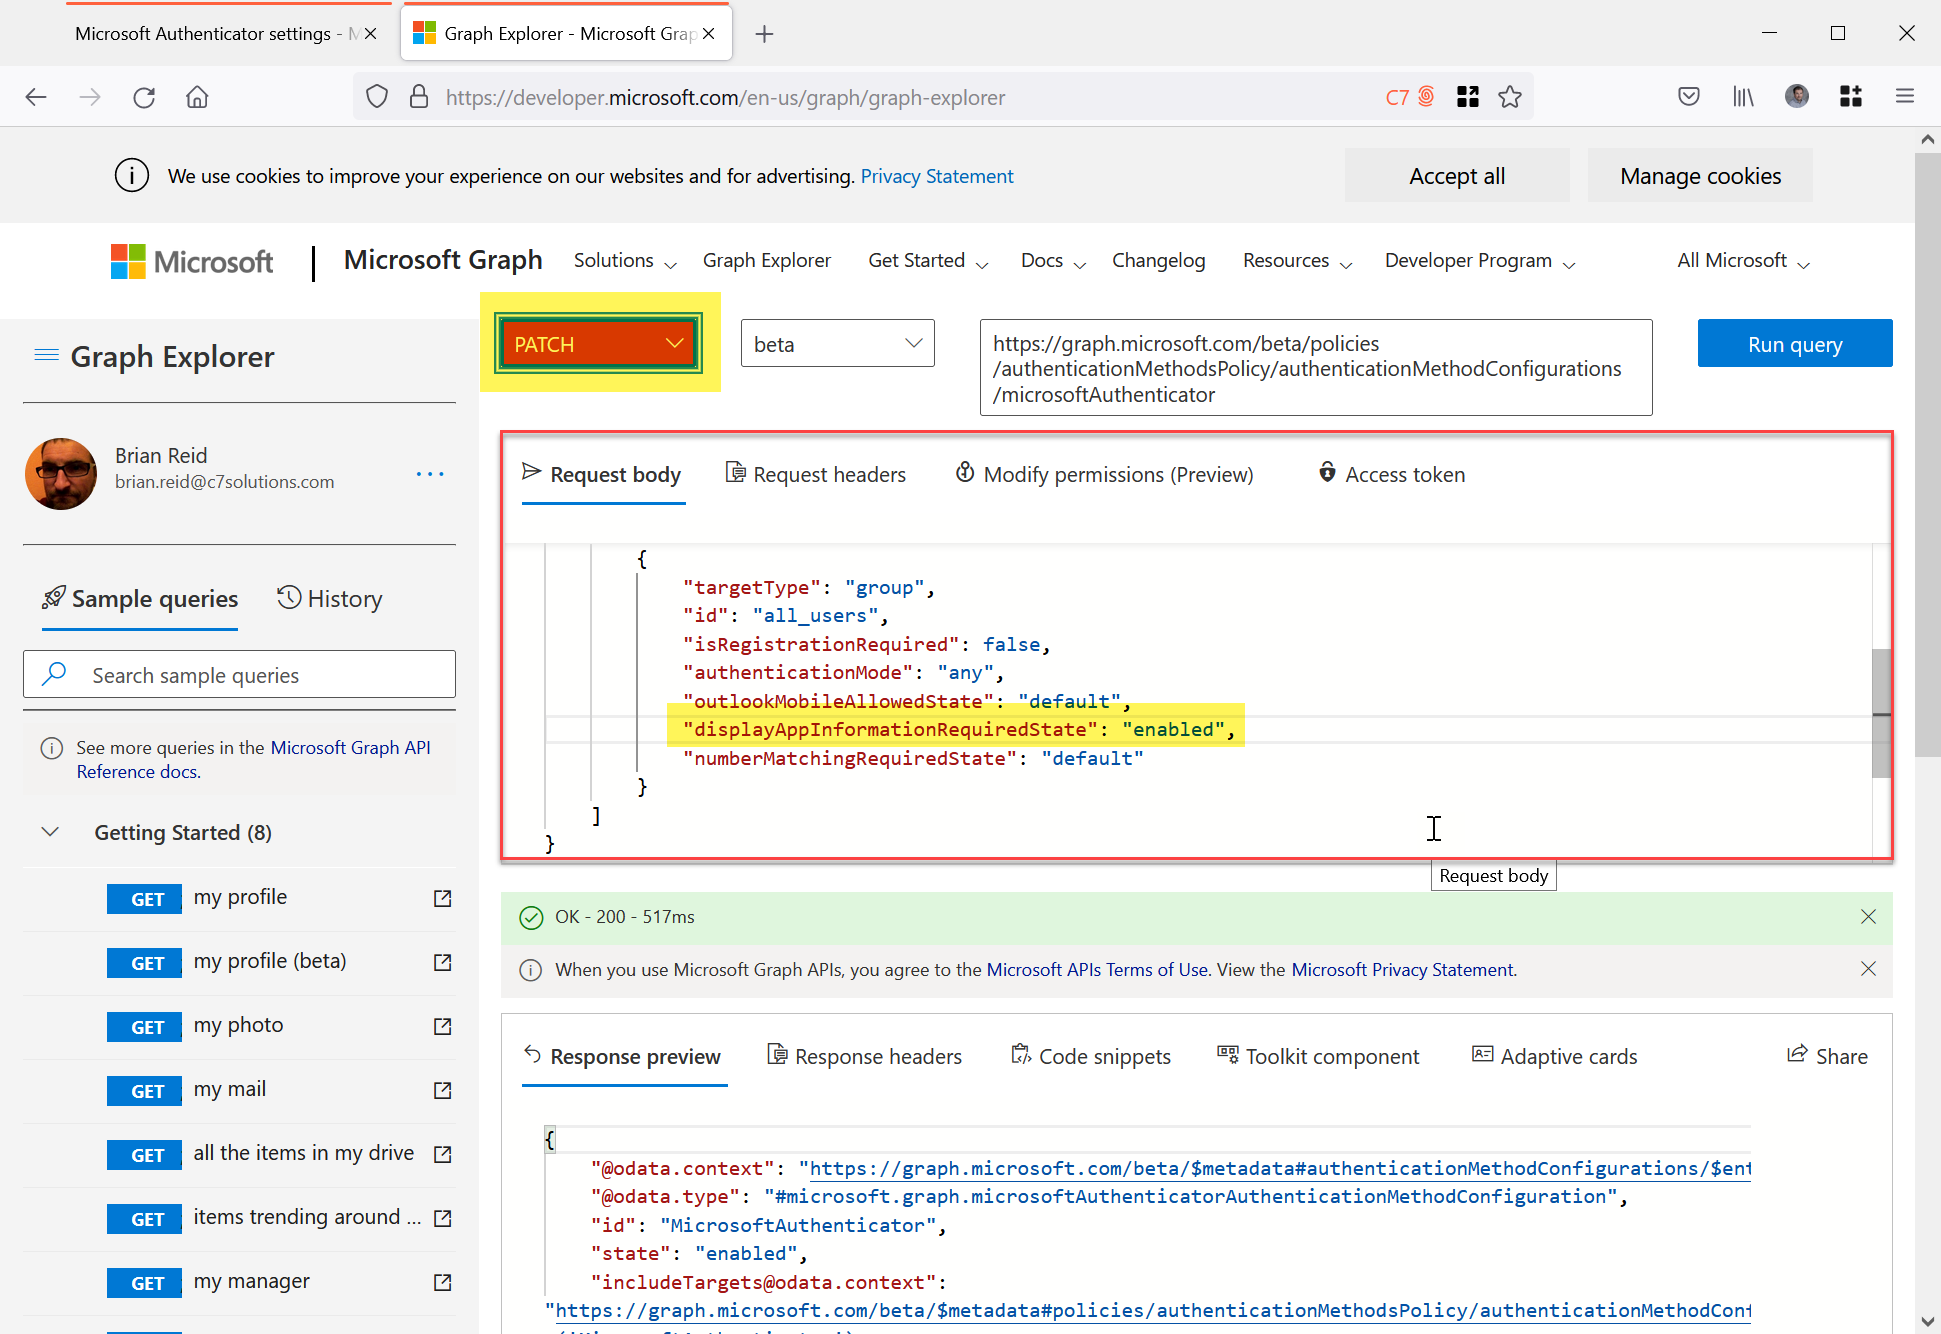
- Change displayAppInformationRequiredState to “enabled” as highlighted above
- Change “GET” to “PATCH” and then Run Query again. This will update the displayAppInformationRequiredState setting to enabled.
- The response should be {} and “No Content” in green in the status bar as shown:

Once location (displayAppInformationRequiredState) is enabled and saved back to Azure AD you can attempt a new login that triggers MFA.
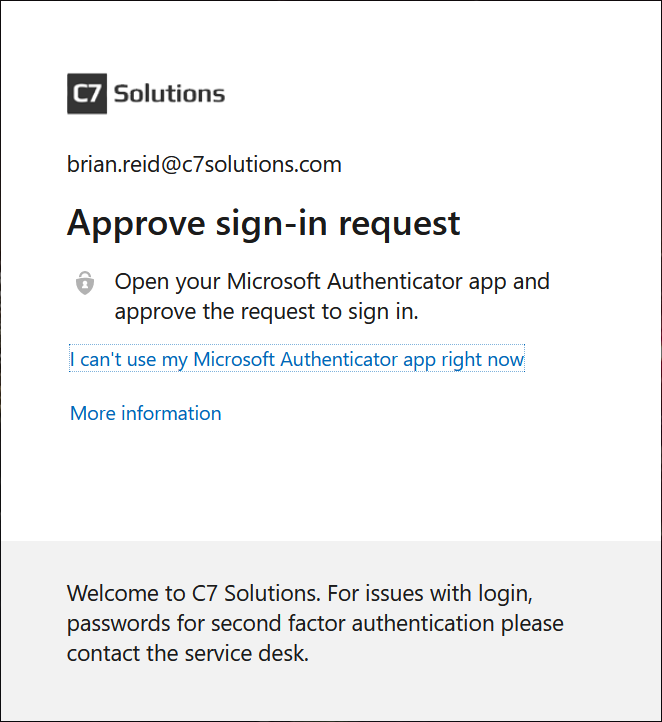
When you get your next MFA login prompt you will see the following on the PC screen – no changes here:
But on your phone, something very different:
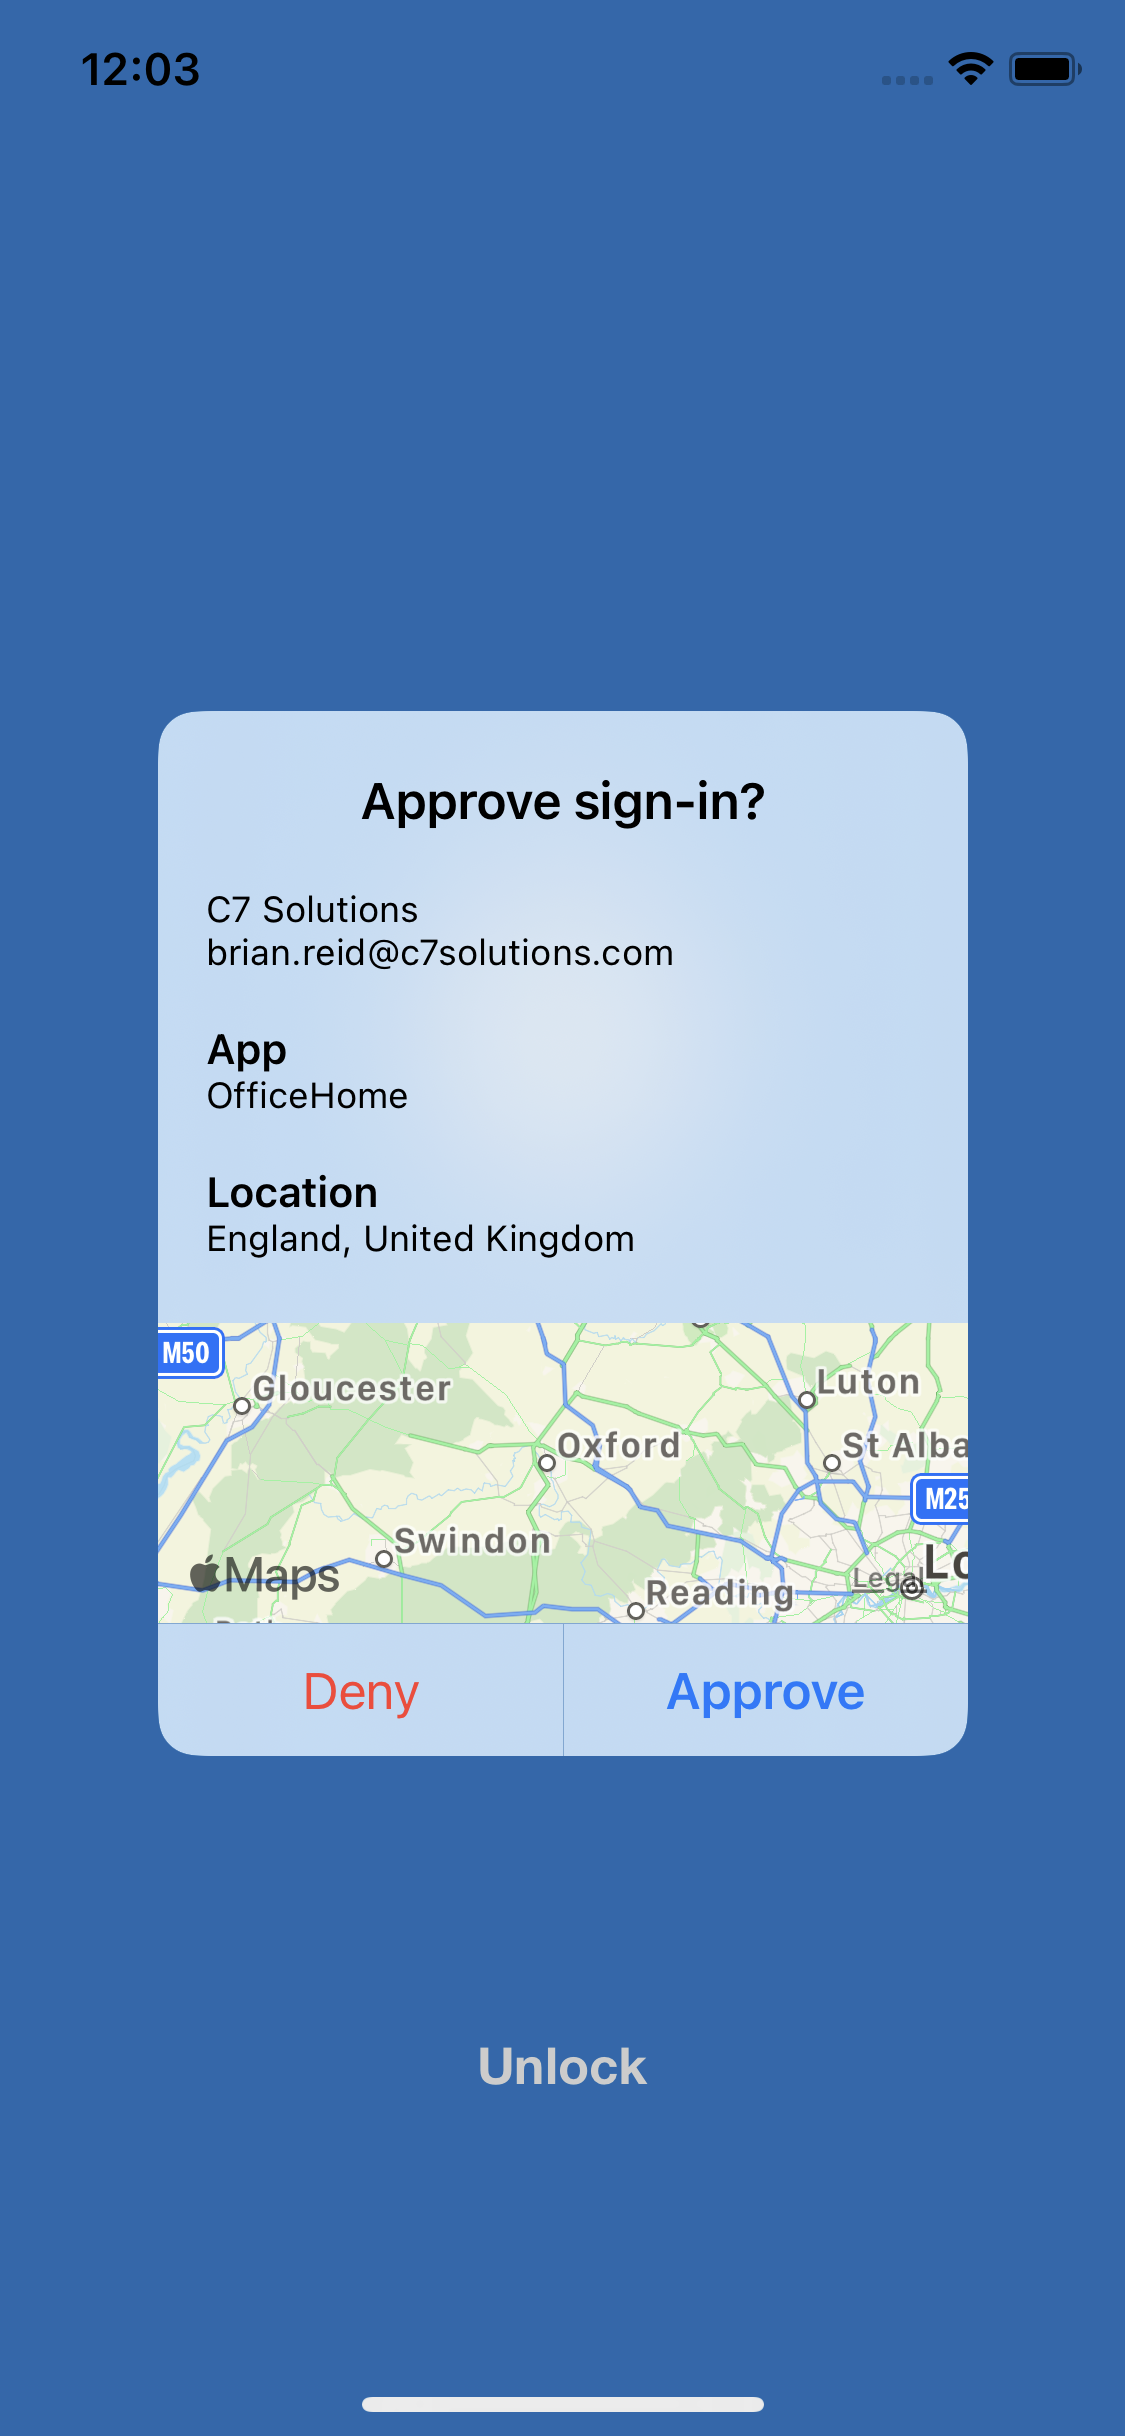
Now we get an MFA prompt that includes location and app context. The app is “OfficeHome” – I visited https://office.com to get this MFA prompt and I was located in Oxford, UK, shown to the state (Oxfordshire) level.
This is great – but one warning, if you are using VDI or routing your Azure AD traffic through a proxy or VPN then you will get a different location from where the user is located and so you might not want to turn it on – if there are a group of users who use VDI for example, then enabled Authentication Methods for everyone but this group and turn on location for them. For the VDI users, or indeed everyone, turn in number match instead (or as well).
Leave a Reply