
Rolling out in November 2021 is a new feature – that of requiring the user to enter a number rather than just click approve on the MFA prompt.
This update to Azure AD requires the use of Push Notifications and therefore requires the use of the Microsoft Authenticator app. It also requires that MFA is enabled for a set or all users via the Azure AD portal and the “Authentication Methods” page.
So before we start, this is what we would see on the mobile device with just Azure AD MFA push notifications (Android view)
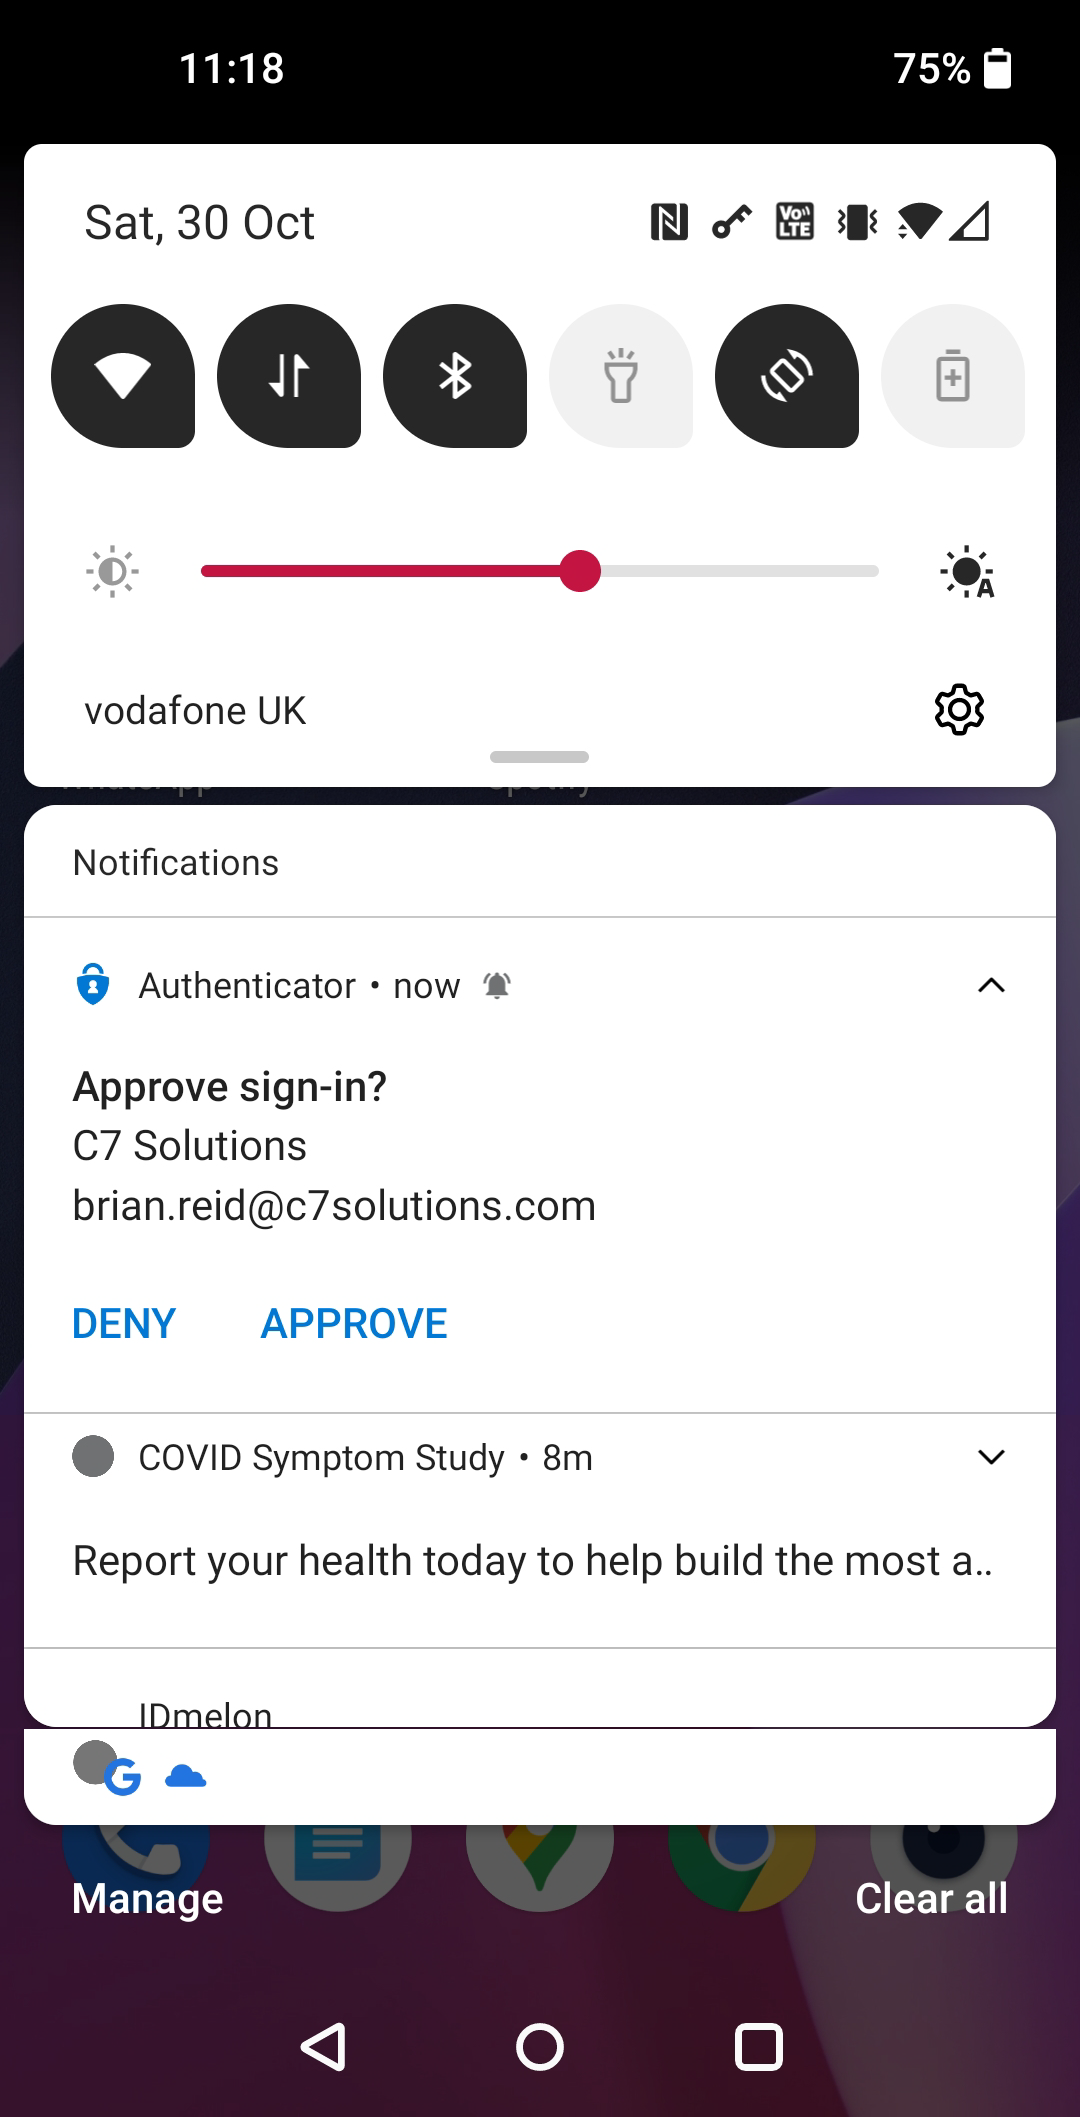
In the above, the user is asked to click Approve (or Deny) without having to actually have initiated the login in the first place.
The “Authentication Methods” page in Azure AD is a control that allows you to roll out Push MFA and/or Passwordless authentication to some or all of your users. It is this control that we can update to include this feature called number match and additionally to implement location of the authentication as well.
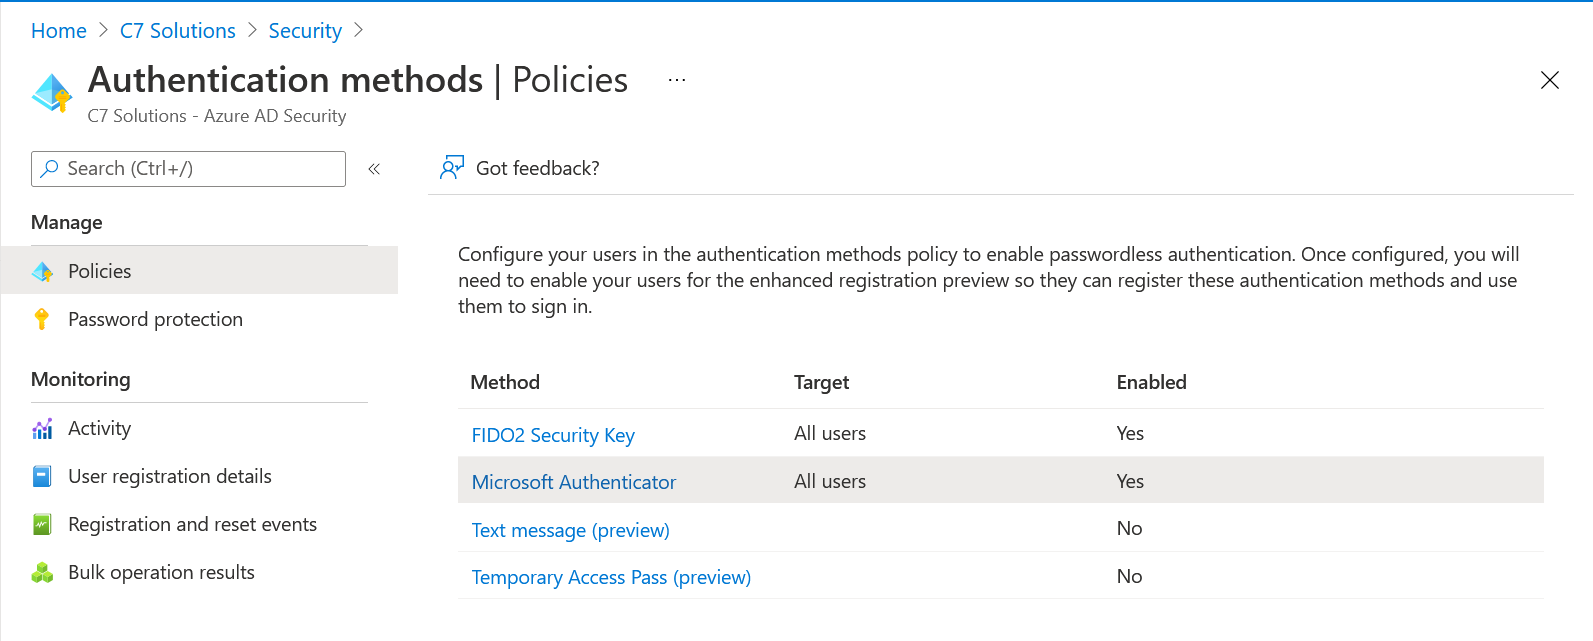
To check your Authentication Methods visit https://portal.azure.com/#blade/Microsoft_AAD_IAM/AuthenticationMethodsMenuBlade/AdminAuthMethods (AAD Admin Portal at https://portal.azure.com > Security > Authentication Methods
Here you will see a number of rows, and we are interested in the Microsoft Authenticator row. By default this is turned off (impacting no users) and we are going to turn it on for everyone. This one change will have no impact on your users if they already have MFA in place, but if they choose the passwordless option on their mobile device they could enabled no-password sign-in now (you could customise the “Authentication Methods” policy for Microsoft Authenticator to turn this off, but as going passwordless is a user decision there is no prompts or change or behaviour just by enabling “all users” for the Microsoft Authenticator policy at this time.
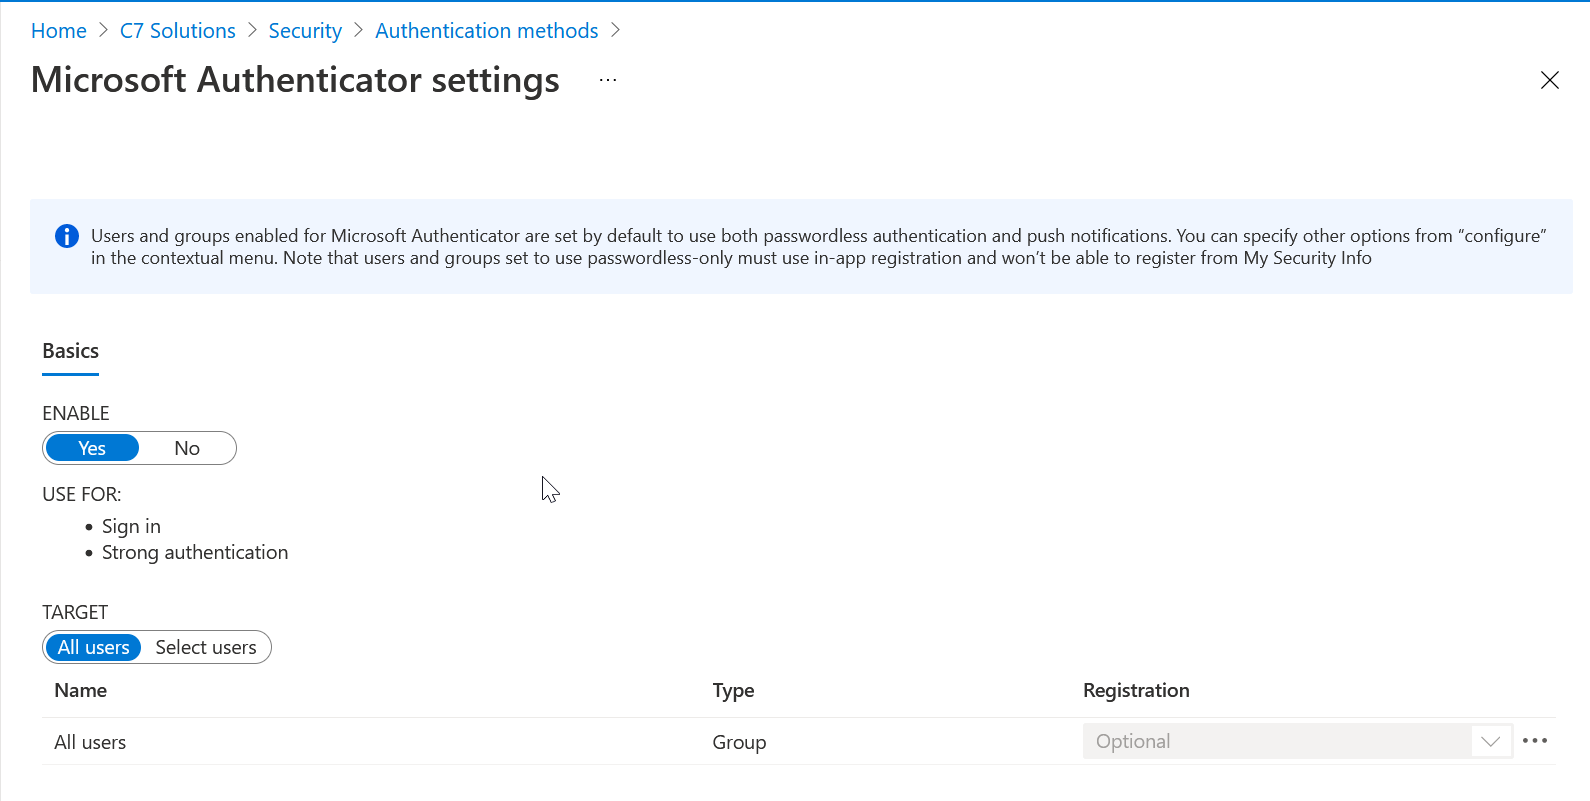
To enable “All users” just select “Enable” if it is not enabled and then “All users” for the Target. If you select a group so you can pilot this change, the below settings will impact the group and not all users. The elipsis (…) on the right is where you can change the defaults to disable push or passwordless. The default is “any” and this allows the user to do push MFA or passwordless authentication with the Microsoft Authenticator app.
There are two ways to enable Number Match. The first is to continue the above settings and modify the Microsoft Authenticator settings and the second is the Microsoft Graph.
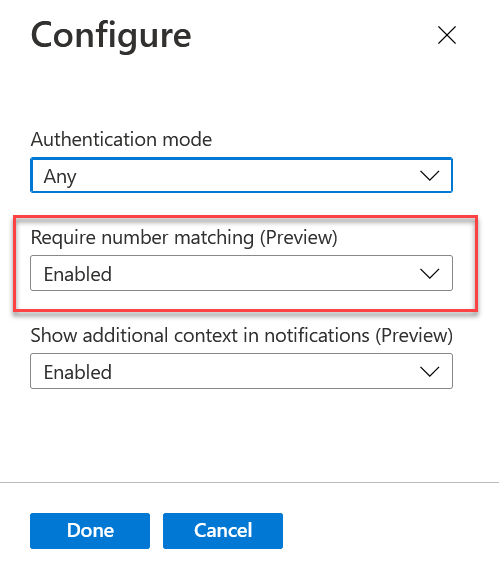
Lets do the easy option first. Click … to the right of the “All Users” row in the Microsoft Authenticator settings above. Then change “Require number matching” and select “Enabled” as shown. You don’t need “Show additional context in notifications” to be Enabled as well – that shows the location that the user did the login from to the user and is covered in my other post on this subject.
We are now done, the users next MFA attempt will show a code on the screen and require it to be entered rather than just clicking “Approve”.
The more complex method for turning this one is via the Microsoft Graph. The reason why this is covered here is that it allows you to programatically set it and get a better understanding of how to use the Graph to control settings. So we need to head to the Microsoft Graph Explorer at https://developer.microsoft.com/graph/graph-explorer (or https://aka.ms/ge) if we want to ‘go complex’ for the same results:
The following are the steps to turn on number matching in Microsoft Authenticator for Push MFA and Passwordless notifications.
- Sign in as your Global Admin account on the left of the Graph Explorer
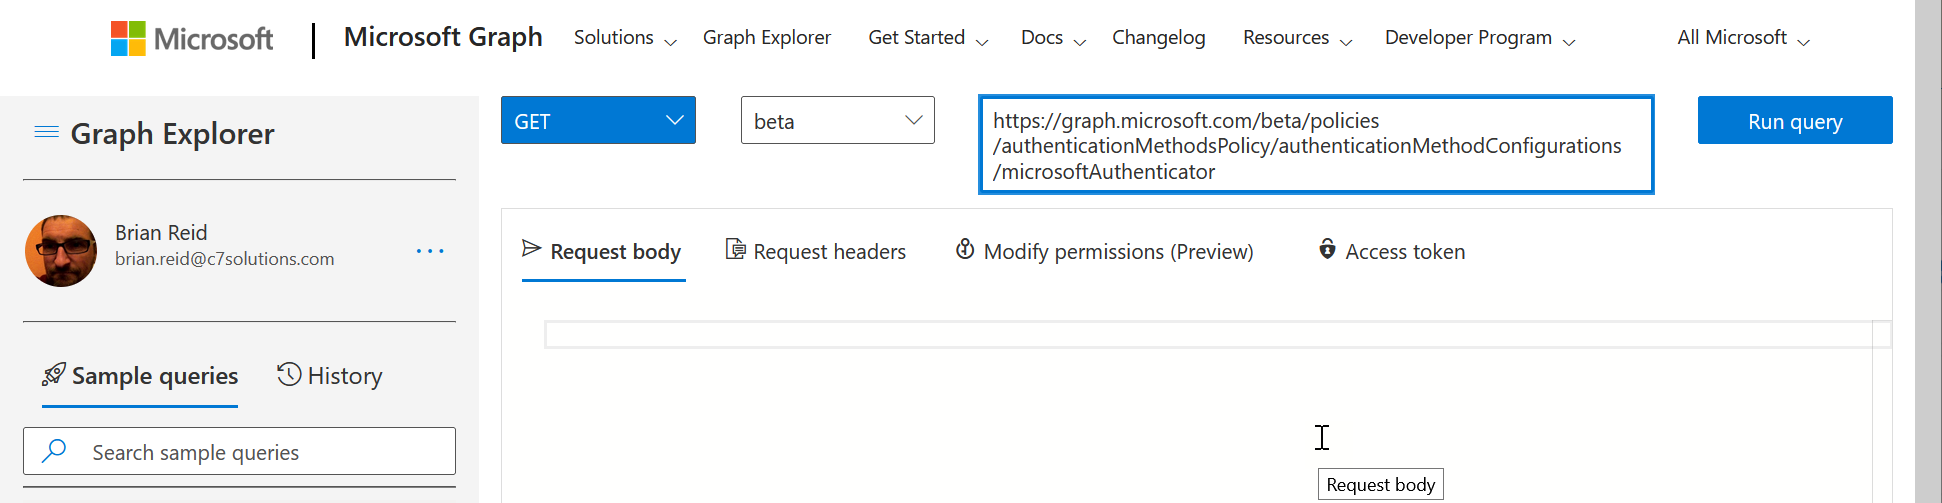
- Change the version control to “beta” and enter https://graph.microsoft.com/beta/policies/authenticationMethodsPolicy/authenticationMethodConfigurations/microsoftAuthenticator as the path to query, as shown:
- Run Query – it will probably fail and tell you “Forbidden – 403 – 191ms. You need to consent to the permissions on the Modify permissions (Preview) tab”.
- If required, select the “Modify Permissions (preview)” tab to see the permissions you need to do this query and to consent to them, as shown:
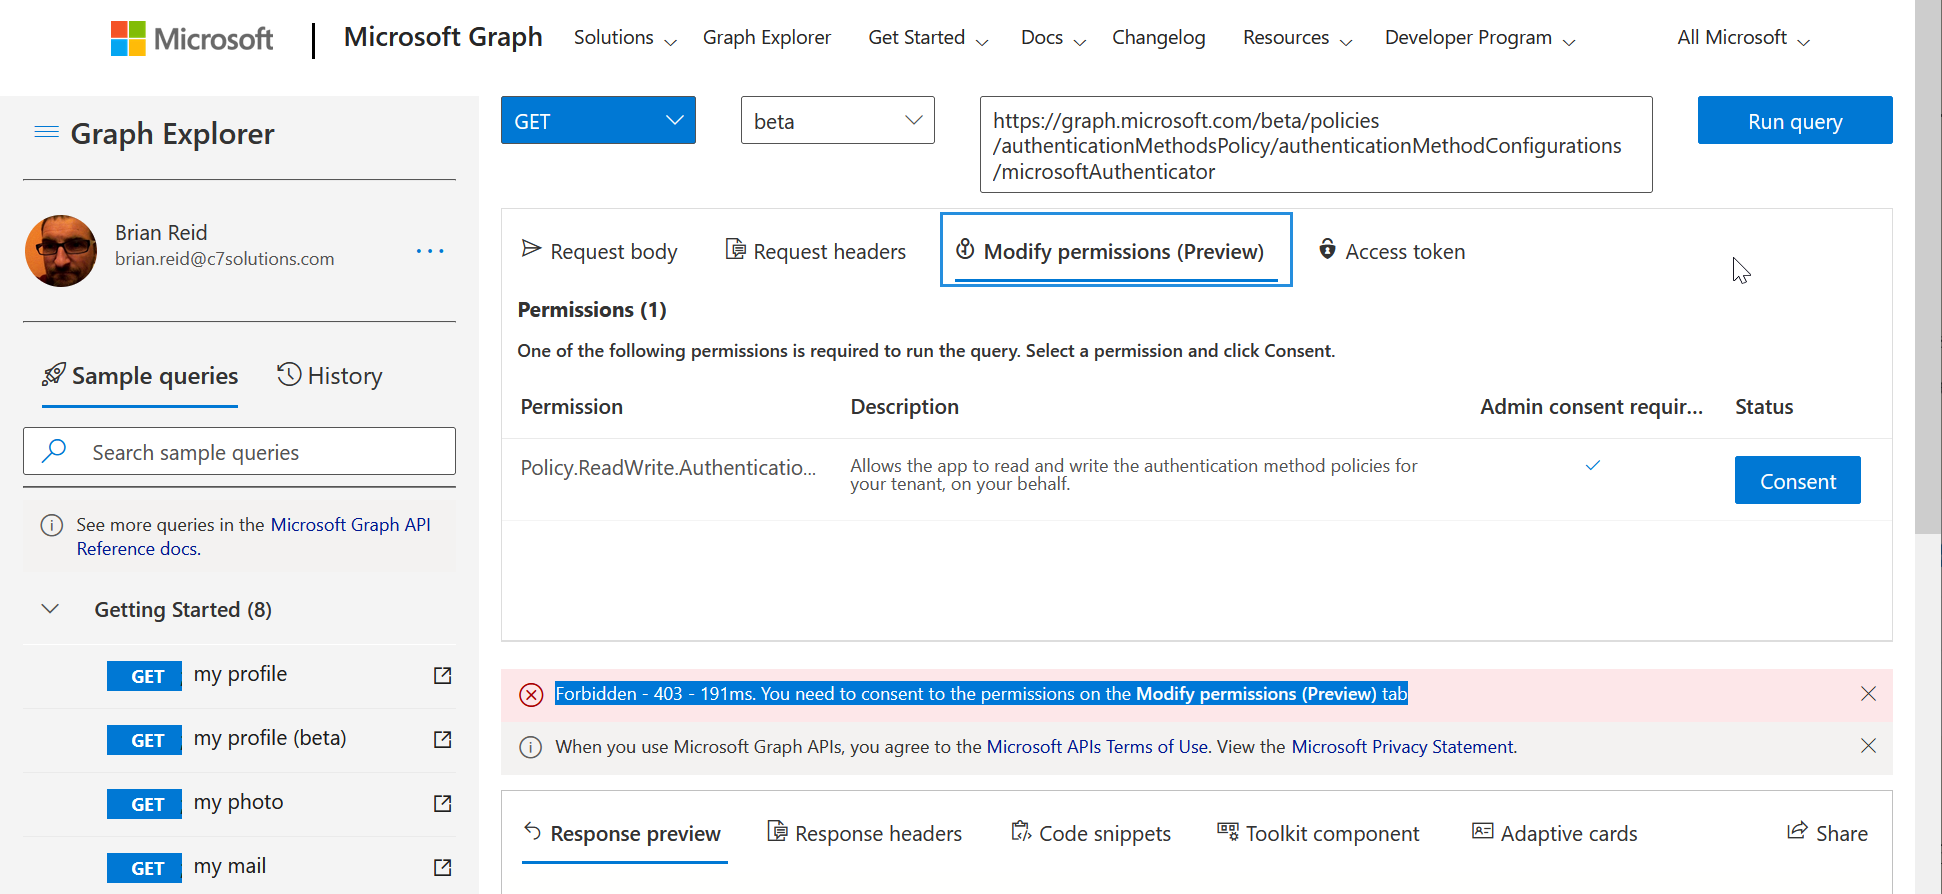
- Click Consent. You do not need to consent for the entire organization as only you are reading and setting these properties for microsoftAuthenticator. The consented permission is Policy.ReadWrite.AuthenticationMethod.
- Run the query again and now you get a response in the “Response Preview” at the bottom of the Graph Explorer. This is a piece of JSON as shown:
{
    "@odata.context": "https://graph.microsoft.com/beta/$metadata#authenticationMethodConfigurations/$entity",
    "@odata.type": "#microsoft.graph.microsoftAuthenticatorAuthenticationMethodConfiguration",
    "id": "MicrosoftAuthenticator",
    "state": "enabled",
    "includeTargets@odata.context": "https://graph.microsoft.com/beta/$metadata#policies/authenticationMethodsPolicy/authenticationMethodConfigurations('MicrosoftAuthenticator')/microsoft.graph.microsoftAuthenticatorAuthenticationMethodConfiguration/includeTargets",
    "includeTargets": [
        {
            "targetType": "group",
            "id": "all_users",
            "isRegistrationRequired": false,
            "authenticationMode": "any",
            "outlookMobileAllowedState": "default",
            "displayAppInformationRequiredState": "default",
            "numberMatchingRequiredState": "default"
        }
    ]
}
- Here we can see the settings for the “Authentication Methods/Microsoft Authenticator” control we enabled.
- We are going to change the numberMatchingRequiredState from “default” to “enabled” to turn on MFA and passwordless number entry matching instead of vanilla “Approve”.
- Copy the whole JSON from your results page (not mine above!) and paste it into the “Request Body” in the middle of the Graph Explorer, as outlined with the red box below

- Change numberMatchingRequiredState to “enabled” as highlighted above
- Change “GET” to “PATCH” and then Run Query again. This will update the numberMatchingRequiredState setting to enabled.
- The response should be {} and “No Content” in green in the status bar as shown:

Once number matching (numberMatchingRequiredState) is enabled and saved back to Azure AD you can attempt a new login that triggers MFA.
When you get your next MFA login prompt you will see the following on the PC screen – no changes here:
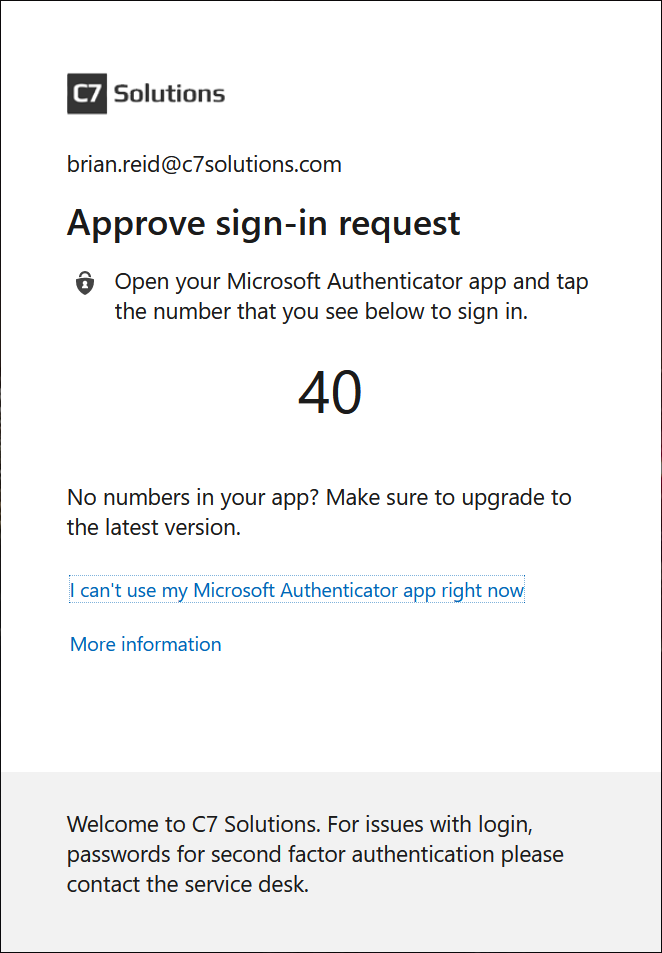
But on your phone, something very different:
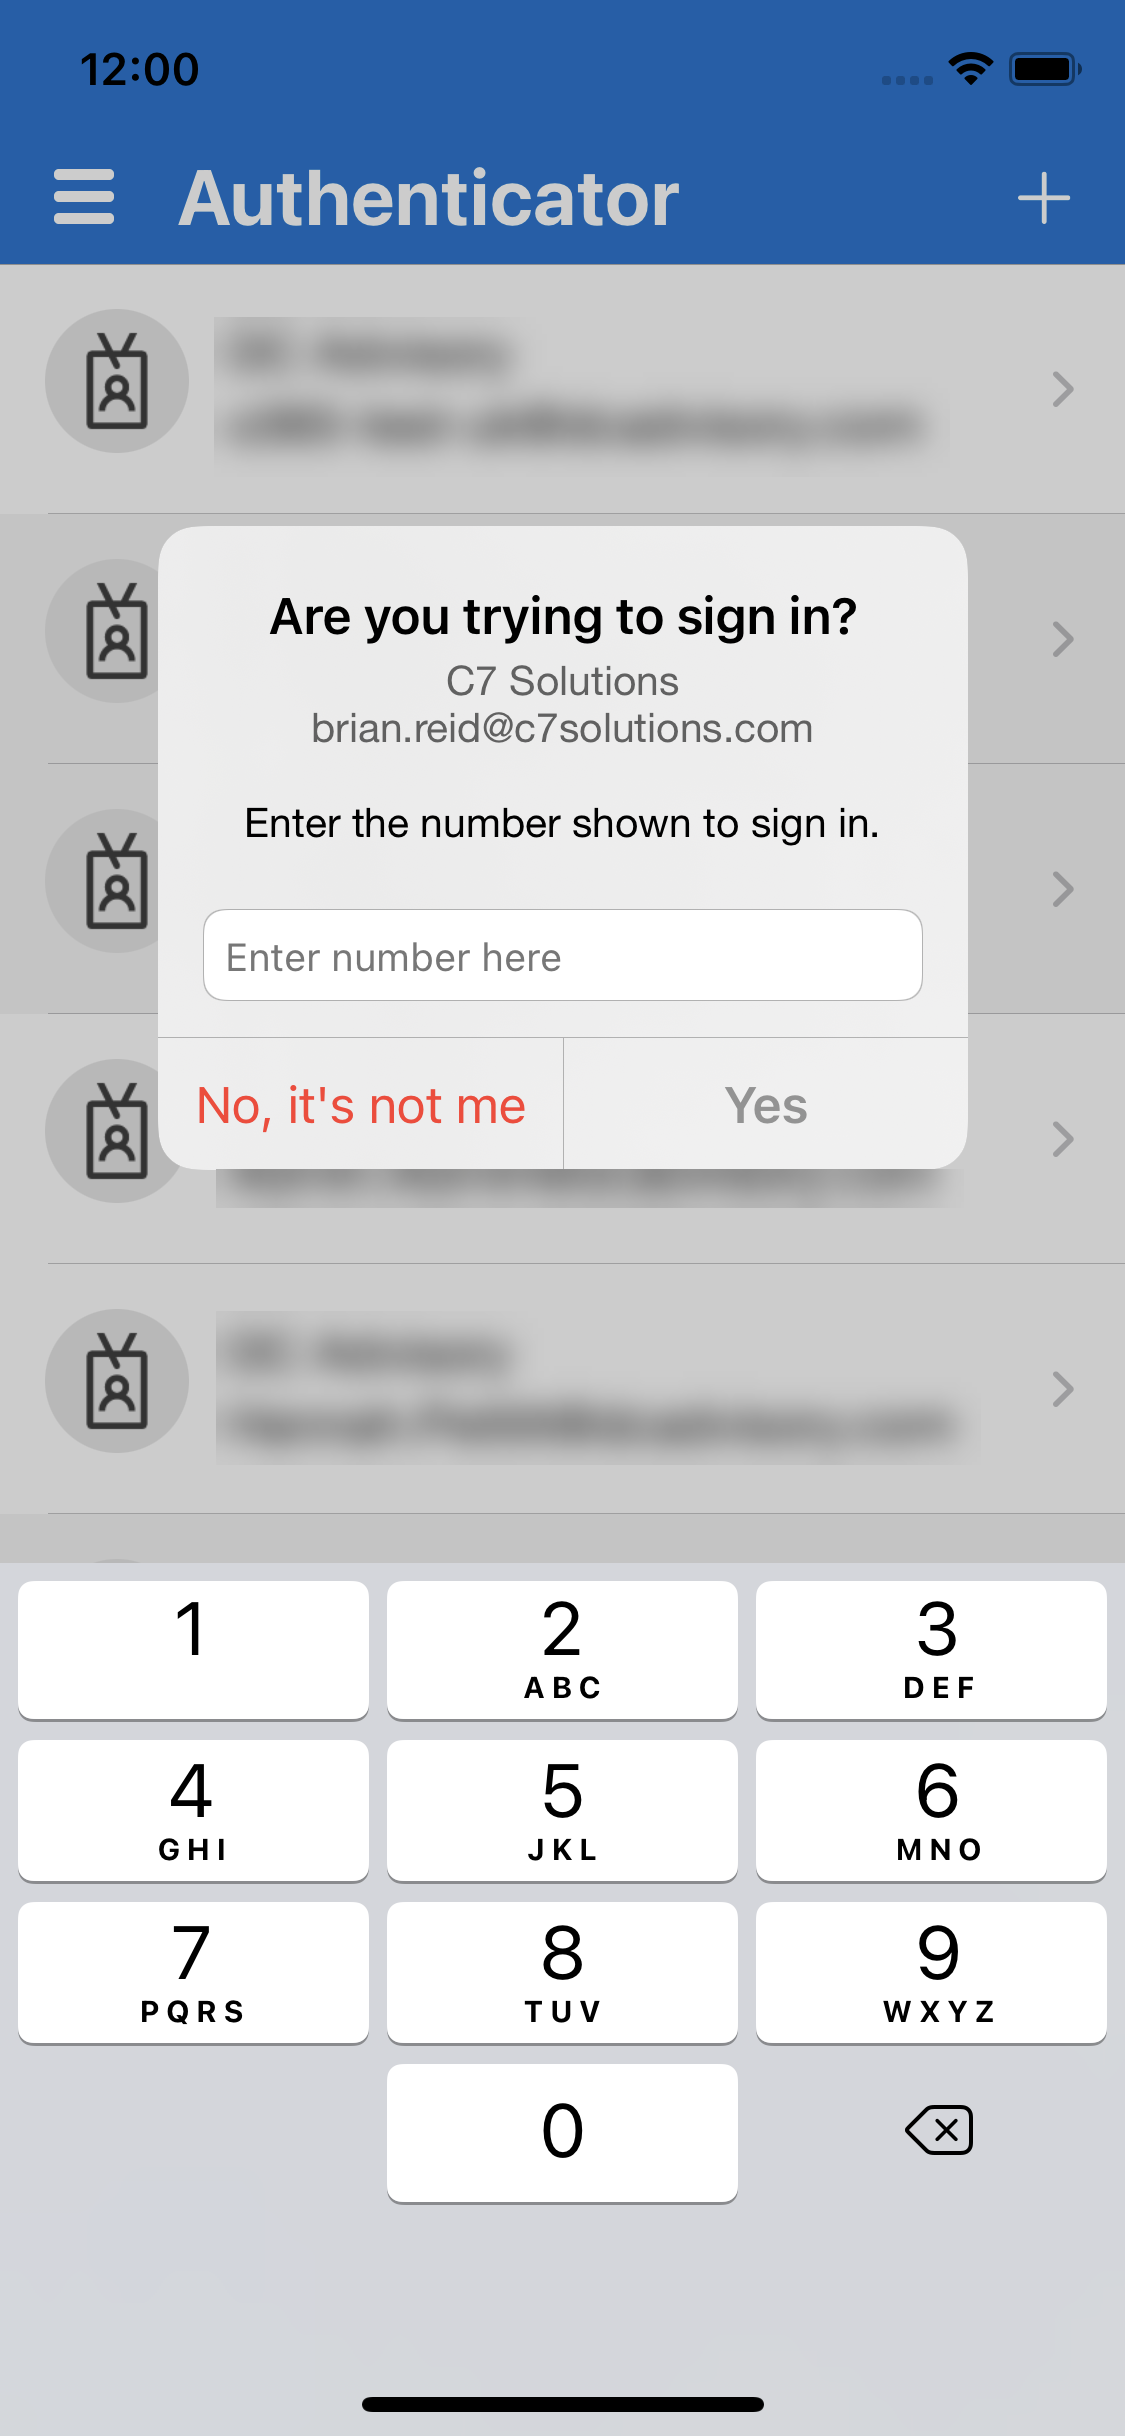
Now we get an MFA prompt that requests the entry of a number. Above shows the iPhone, Android is supported as well. We need to enter the number shown to us at our login to approve the MFA prompt
Also note that you can change the displayAppInformationRequiredState value to enabled as well. This turns on location display and can be used in conjunction with number matching.
Leave a Reply